So You Wanna Be a Sniper?

If you spend any time at all in the airsoft world, you will invariably come across someone who wants to be an airsoft “sniper.” You yourself may even want to be this in due time.

But what is an airsoft sniper exactly? As a new player to airsoft, you may be approaching the idea with visions of Battlefield 4 and being able to “quick-scope” your way through enemy legions. Continue reading “So You Wanna Be a Sniper?”

Battlelink Minimalist Stock Review

I received a few new items in the mail today, among them the relatively new to the market Mission First Tactical Battlelink Minimalist Stock.

While there aren’t as many options for trimming weight off your M4 AEG as there are real steel, furniture selection can make a distinct difference in feel, weight, and handling. The BMS, as it is known, is advertised
as the “lightest stock on the market” – one of its primary selling features amongst an ultra-low-profile design and of course an overall ‘minimalist’ design.

Features and Specifications

  • 5.8 oz. total weight.
  • Reinforced DuPont Polyamid construction.
  • Angled non-slip rubberized buttpad.
  • Quick Detach Sling mounting point incorporated for optimum
    usage with ambidextrous shooters.
  • Offered for Mil-Spec and Commercial buffer tube diameters (most AEG’s use Mil-Spec diamters, but it pays heed to check before purchasing.)
  • Made in the USA.
  • Average retail price of $59.99
Besides being incredibly lightweight, the other immediately noticeable feature of this stock is the fact that it doesn’t have a traditional triangular design. Instead it is more “L” shaped, which may be a point of criticism

for some; i.e. “it’s not going to be as strong as a traditional stock design.” In other words don’t try to break a door down with it. I do not feel this is a claim with much merit, though, as an M4 is hardly suited for this task to begin with (that’s how I destroyed a buffer tube once.) Get an AK if you want to be in the business of breaking doors.

The minimalist design extends to the release latch, which is a flush-fitting design that doesn’t protrude into places it shouldn’t. Fitment of the stock to the buffer tube is quite tight. It does not rattle or wiggle much, which is a nice feature for the noise conscious. The top of the stock features a witness whole for those who might have
buffer tubes with numbered positions. Just forward of the stock latch is a QD socket for Quick-Detach sling swivels. It is non-rotational limited, which is a plus in my book, but may be a negative for those who prefer rotational-limited sockets. The angled buttplate is made of a hard rubberized material that is quite grippy. I definitely appreciate the angle of the bottom toe on the stock as it allows for faster presentation from the low-ready position. It just seems to clear the shoulder better than a Magpul CTR stock, or even the standard A2 style.

Size-wise, this stock is nearly the same size as the Magpul CTR stock in length and buttpad height, minus the extra support arm. It is, however, lighter than the CTR stock.

Some have mentioned that the L shaped design might snag more on your gear, clothing, etc. Through my testing, I have yet to snag the stock on my load bearing gear or my clothing. Mission First Tactical is now offering a paracord “cobra braid” for those who are concerned. Whether or not you need this is up to individual preference. I personally do not feel it is a necessary item.

The BMS stock is offered in the following colors:

  • Black
  • Flat Dark Earth (discontinued – and actually this is a very light tan color, not true FDE)
  • Foliage Green
  • Grey
  • Scorched Dark Earth (exact color match to Magpul FDE)

For my build I selected Foliage Green colorway. It doesn’t quite match the shade of Foliage as used by Magpul in their MIAD grip, nor does it quite match the VLTOR CASV-M (however, the Magpul grip and the CASV color shades are near identical). It’s just a bit lighter, but still recognizable as Foliage. For the color purists who need everything to absolutely match, you will likely have a nervous breakdown. I suggest you speed-dial your Cerakote refinisher before ordering this stock.

Conclusions

I’m pretty happy with this stock and would have no problems recommending it to someone who’s looking for an ultra-lightweight package. I do not feel it is a weakly designed part – rather the contrary; it feels very rigid and sturdy. I also feel that it comes off the low-ready faster than any other stock out there, mostly due to the angled in toe on the bottom of the buttplate.Coupled with weight loss treatments to the front-end, or perhaps nylon / plastic (forgive me, but eeeeeew) receivers you could have yourself a really lightweight build.

Midwest Industries AKS-74U / Krinkov Rail

In the realm of aftermarket rail options for the Krinkov or AKS-74U style weapons, there exists few quality options. Among the top four are (in no particular order):

  1. Ultimak Railed Gas Tube. The lowest and lightest profile option available. Will allow co-witness. Does not come with, nor is there offered a lower railed handguard at this point in time. Compatible with most Krinkov / AKS-74U styles, but you will have to modify the gas tube to be large enough to accept your batteries.
  2. Krebs Custom Krinkov Rail. Built like a tank, weighs like a tank, and is almost as expensive as one too. Does not allow for co-witness.
  3. Samson Mfg. K-Rail. Fairly lightweight with no co-witness options available. Does offer a cutout for underfolder style stocks. Just as expensive as a Krebs option.
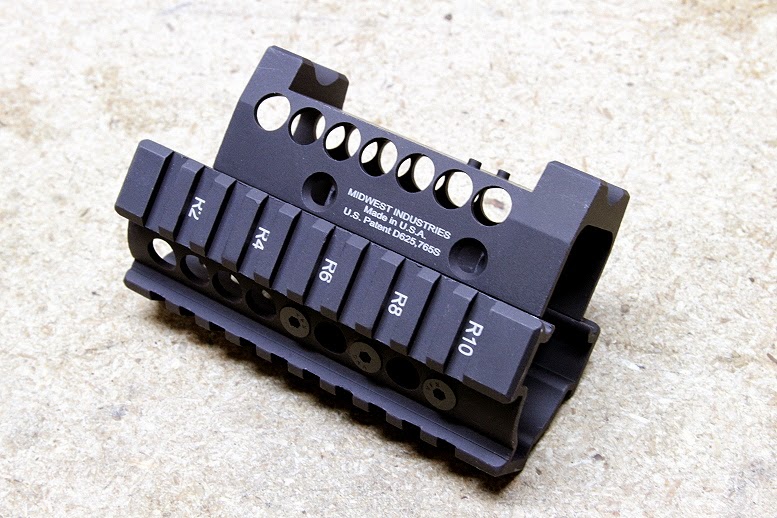
  4. Midwest Industries Krinkov Rail. The middleweight option that offers multiple optic-specific top covers for Aimpoint 30mm tubes, Vortex Sparc, Primary Arms Micro-Dot, Burris Fastfire, Trijicon RMR, Aimpoint T1/H1, or a picatinny railed top cover. Most top covers allow for co-witness.

There are, of course a few other options out there, such as Zenitco rails, which are high quality Russian setups, but are hard to find and command premium prices. FAB Defense makes an ugly rail setup, but to be bluntly honest, most Israeli gun accessories are garbage (especially FOBUS holsters) – so unless your significant other has cut off your allowance, I would avoid them.

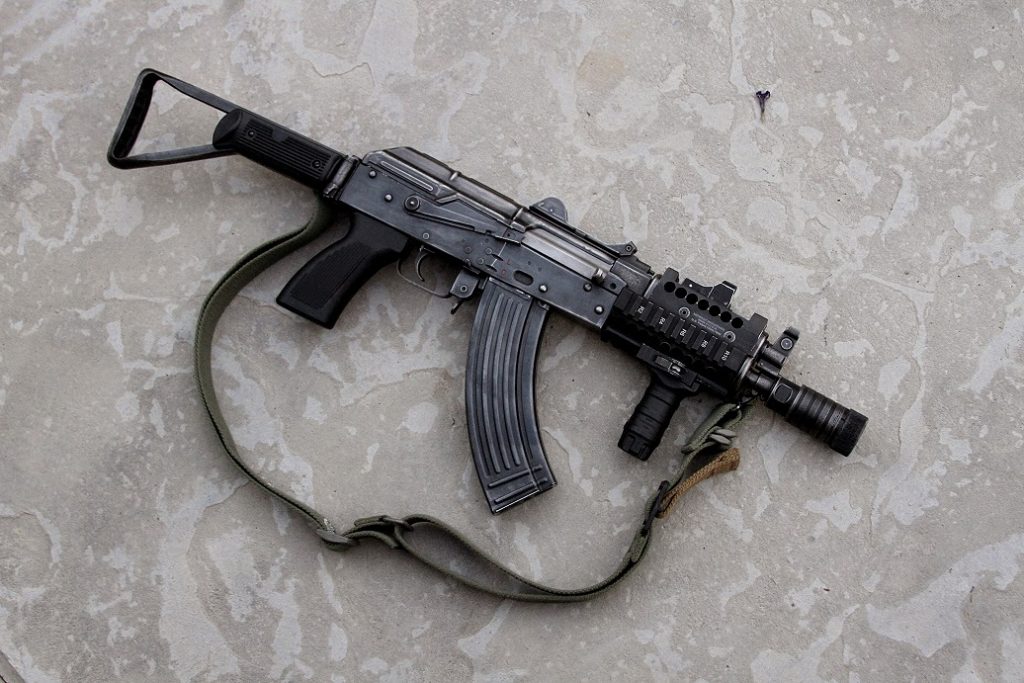
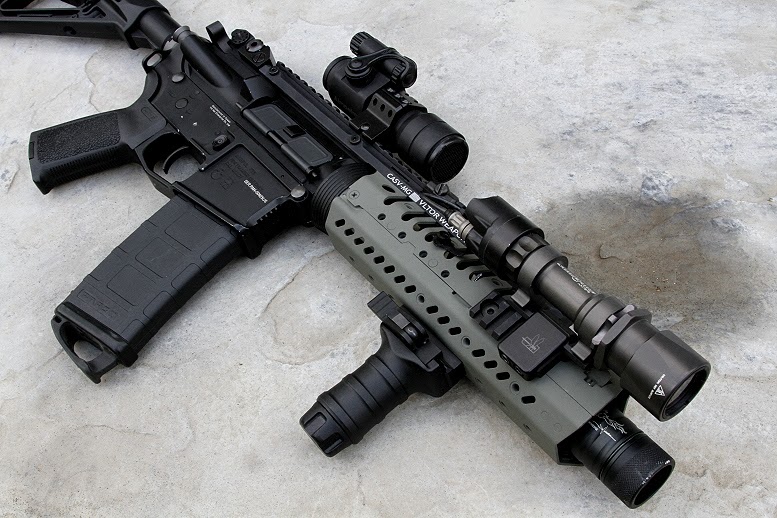
This review will cover the Midwest Industries rail. For my particular purposes, I selected the model that has the top cover designed for the Trijicon RMR to be fitted onto a Real Sword Type 56-2 with a modified LCT AKS-74U frontset.

Features and specifications:

  • 6061 Hard coat anodized aluminum.
  • Mil-Spec 1913 picatinny rails.
  • No gunsmith install.
  • Weighs 9.5oz.
  • 100% Made in USA.
  • Average retail of $124.

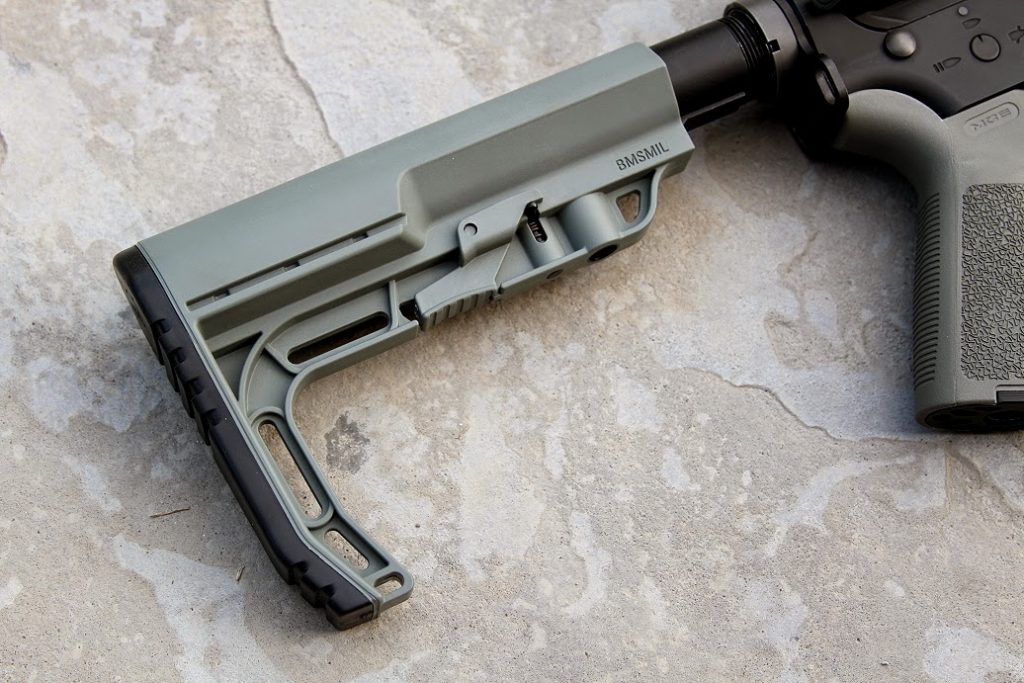
These rails were originally a collaborative effort between US Palm and Midwest Industries. It should be noted that US Palm no longer appears to be involved in the process, so as such you will likely not be getting a rail with the US Palm trades (unless it’s old stock.) Overall fit and feel of this rail is that it is a solid piece of engineering though. While it is listed at 9.5oz without an optic, it feels like it has more heft to it. Every kit includes all mounting hardware, screws, blue Loc-Tite, and a small collection of Allen wrenches, plus a bumper sticker or two.

The whole apparatus basically consists of two sections: the lower handguard portion which contains three picatinny rails, and the top optic-specific top cover. I do not believe it is possible to simply use the lower handguard by itself without removing the mounting surfaces for the top cover, which would be a permanent modification. The handguard requires the use of an included barrel mount in order to stay attached to the weapon. If the barrel mount were removed, the handguard would then drop free as it does not use the weapons’ normal handguard retainer pieces.

Installing the rail is ridiculously easy and can be accomplished in minutes. Simply remove your existing
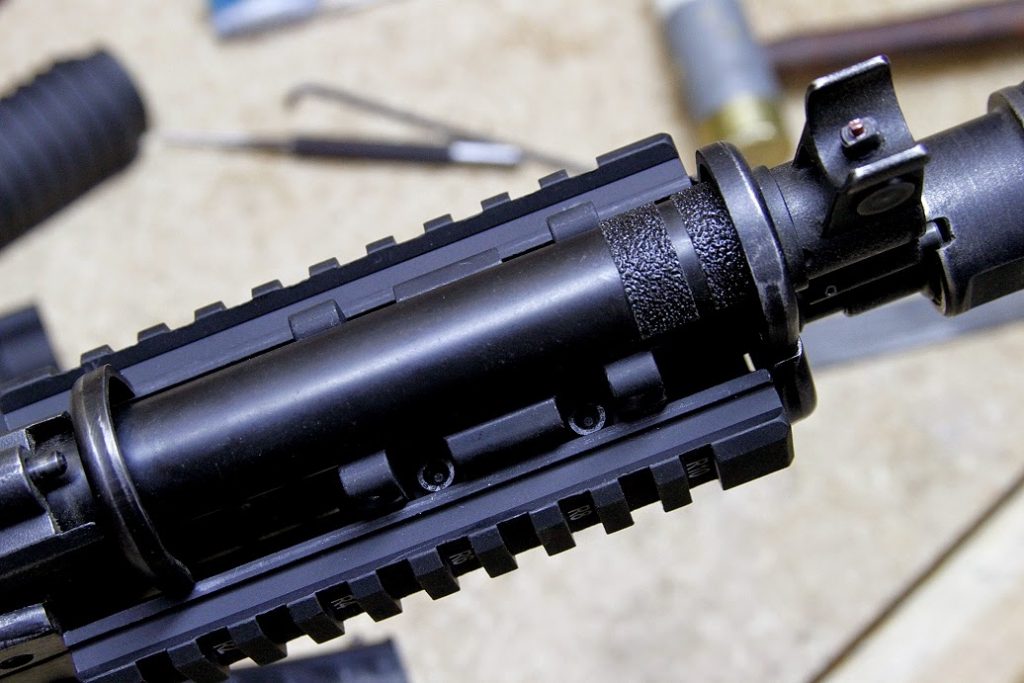
handguards – top and bottom. You will want to retain your gas tube (leave the handguard retaining hardware on there.) Attach the lower handguard first.You will notice that the lower half of the barrel mount has already been installed for you by the factory. All you have to do in this case, is simply attach the top half of the barrel mount using the included screws. Blue Loc-Tite has also been included with the rail kit, but as this is mounting to an AEG and it has very little recoil, I would posit that simply torquing down the screws will be sufficient. As it is, you need to at least have access to the internals of the gun should a repair be in order, which requires the removal of the barrel and handguards

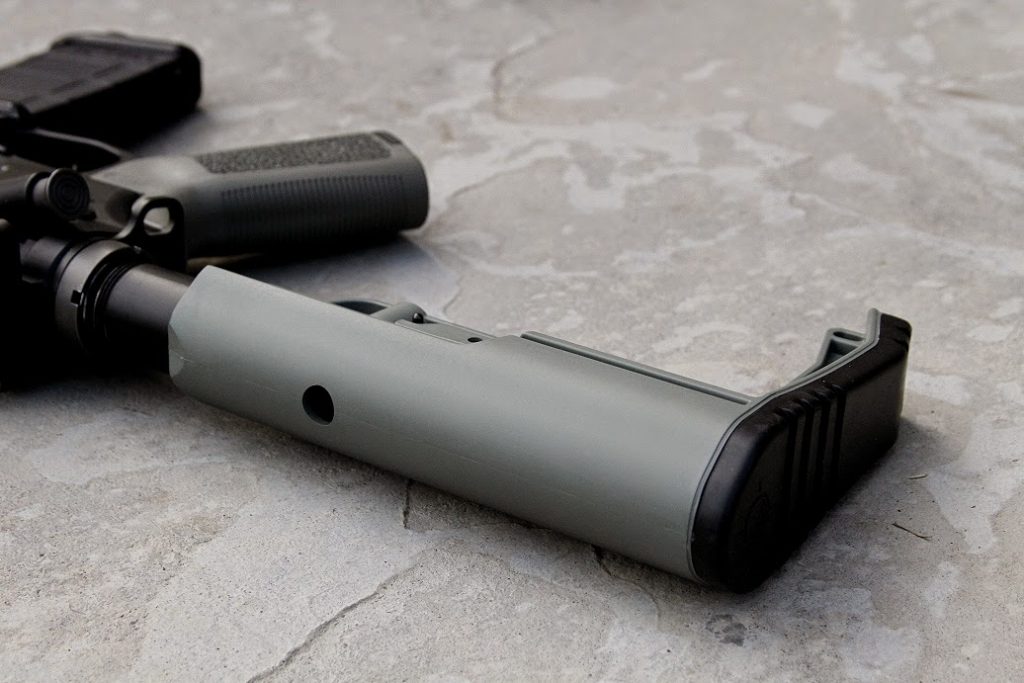
The top cover is fastened on with four screws that install from the side into the barrel mount itself. Once tightened down, the whole assembly is rock-solid. There is zero wiggle or movement. I found the best way to ensure the handguard is attached to the weapon straight is to align the bottom picattiny rail to the flat underside of the AEG receiver. This will put the rail inline with your gun, and ensure nothing is off kilter.

Depending on your AEG design, you may have to insert your gas tube further into the barrel trunnion assembly. My original handguards were longer than the Midwest Industries assembly was, and this was necessary to eliminate the gaps I found upon first install. After you have installed the top and bottom handguards, install the bottom handguard retainer cap, then the top one – the top cap is what retains the bottom one. Then slide on your front sight tower and make sure it comes all the way back and indexes into the top handguard cap. You may have to give it a smack or two with a nylon hammer to make sure it’s positively seated. Crank all your set screws down and you should be finished!

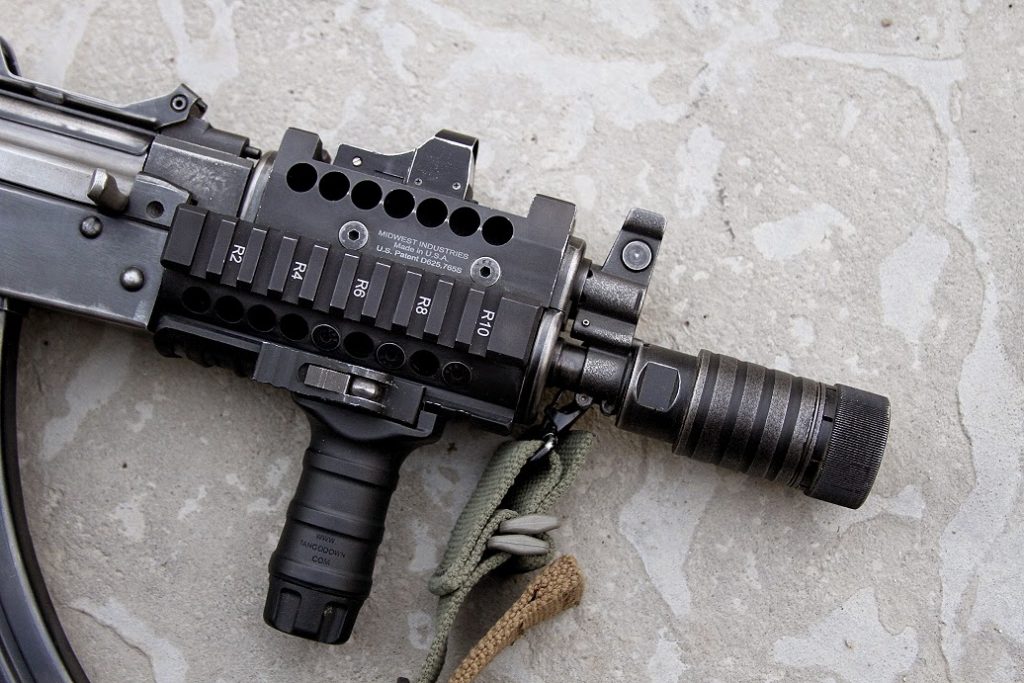
As I don’t have a Trijicon RMR (yet), I modified the top cover slightly by drilling and tapping two holes so it could accept a NC-Star micro-red dot I had on hand. While it doesn’t have quite the cool factor as the real deal, it will have to do for now. This particular model features the automatic brightness adjust and a green dot reticule. I also “weatherized” the finish of the rail a bit as it looked kind of weird being all new and shiny compared to the rest of the gun.

Notes and Observations

One thing you will notice as the end user of this rail is that it doesn’t exactly “flow” into the receiver of the gun. The handguard is rounded, whereas the receiver is squared off. This is more of an aesthetic complaint than a engineering defect or the like. Incidentally, Midwest Industries includes a receiver plug that is designed to fit into the empty space that is normally filled with a handguard tang – and this is where my chief complaint arises with this system.

Firstly, it is not mentioned that this plug is actually included with the rail kit. You have the option, of course, to purchase this separately – which is what I did. Not a huge deal . . . I’m just out an extra $7.50.

Secondly, the plug itself is made of the same anodized aluminum as the handguard. It is small and slightly difficult to work with. Real Swords use Chinese spec receivers, which are thicker and heavier than Russian / EastBloc type receivers (or any other AEG receivers in general). This requires the plug to be modified to fit – which isn’t easy as it’s small and slippery. I would have preferred the plug to have been made of high-density Delrin, or maybe glass-reinforced nylon as an alternative material. It would have been much quicker and easier to install that way. For someone who may be lacking metal-working tools, I could see it presenting a tougher problem to solve. You can of course ignore and not use it if so desired.

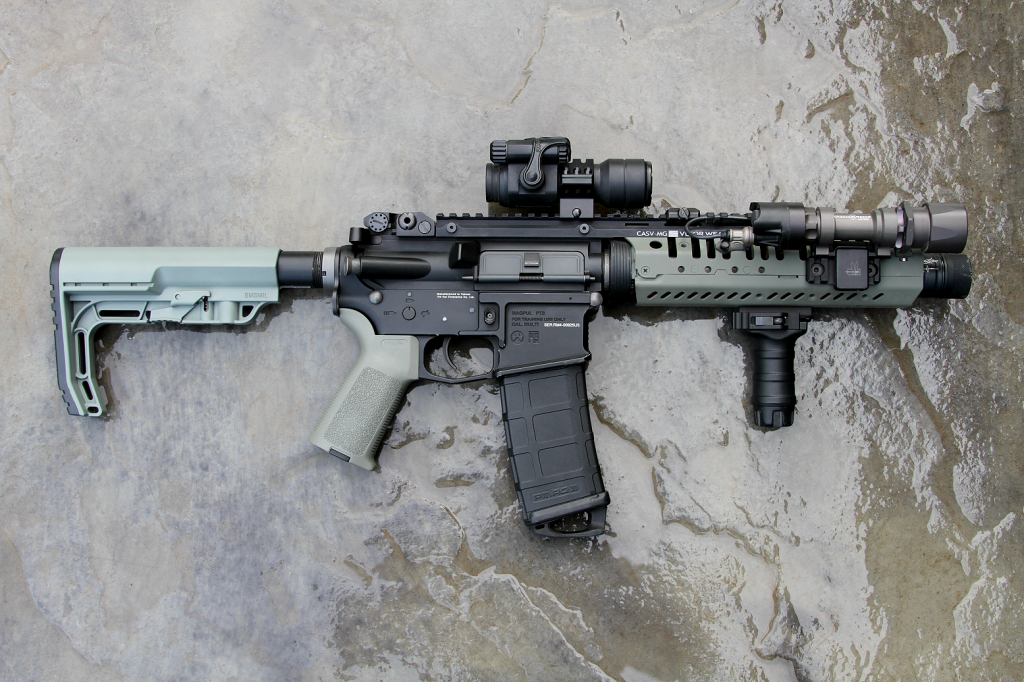
Being designed for the Krinkov / AKS-74U platform, this rail doesn’t have a tremendous amount of real estate. If you’re used to extended forearm or thumb-over-bore techniques, you’re looking at the wrong rail. This is designed for a fairly tight package, and as such, you will need smaller and more compact accessories mounted to it. In particular, vertical foregrips. Whether you grip them broom handle style, or use them as a modified handstop (which I personally do), you will need one short enough to ensure the magazine can be extracted properly. Certain longer foregrips, like the Knights Armament style or say, a GripPod, will interfere or prevent extraction of a magazine. This is because an AK magazine must be rocked forward to be removed.

Vertical grips that do work (personally tested and verified):

  • Tango Down Stubby (QD or slide-on style.)
  • Magpul MOE MVG
  • Magpul AFG II (fits perfectly)
  • Magpul AFG I (fits, but is longer than Ver. 2, so it sticks past the rail a bit)
  • Magpul XTM handguard stop kit (it clears, but really crowds your grip space – not very ideal on this setup unfortunately.)
  • LaRue Tactical LT-FUG

For mounting a flashlight, you will probably want to consider a forward mount, like the Haley Strategic Thorntail design, or the Magpul Rail Light Mount. Especially if you’re planning on activating it with your support hand thumb or independent of a tape switch.

Conclusions

Overall I am fairly pleased with this setup. Once I get a proper Trijicon RMR mounted up, I think it will be the cats meow as it will offer co-witness and excellent cheek weld for this platform. At $124, I do not think it is overpriced – especially for a made in the USA product that is often awash in exorbitantly priced firearm accessories. Midwest Industries has always made excellent products, and this is no exception. The only thing that might improve it would be a design that had a seamless flow into the receiver (kind of like the Zenitco rail) and maybe a Keymod system instead of full picatinny rails. I suspect this latter improvement is already in the design works, however, as they just released a Keymod rail for the Yugo M92 style AK’s.


KWA Air Nozzle Alternative?

Editors note: This article should be considered deprecated and exists for historical purposes only. An updated article covering current standards can be found here.

One point of contention with many regarding KWA AEG’s is their use of a proprietary air nozzle. While it is claimed that most KWA internals are Tokyo Marui spec – this is only partially true. With the advent of the newer 3GX gearbox – itself an evolution of the 2GX – KWA has departed even farther from the TM spec design and many internal parts are unique and proprietary enough to cause issues should you try to source alternatives.

My personal experience with most KWA’s is that they have less than satisfactory air compression or suffer from FPS loss out of the box. Your mileage may vary, of course. We have previously covered one technique to dealing with low FPS in KWA AEG’s here. With regard to specific air seal parts, the cylinder head to cylinder fitment is usually quite good and can even be extremely tight should you use an aftermarket cylinder. Guarder cylinders in particular are very tight and care must be taken not to cut the cylinder head o-ring when installing one. It should be noted that most highly knowledgeable experts on KWA recommend replacing all the internal o-rings as a matter of course due to their quality (or lack thereof.) Experience leads me to tend to concur and as such I will throw in higher quality o-rings as soon as I crack open a new gearbox.

The air nozzle on the 2GX and 3GX gearboxes is a slightly strange and proprietary design. It does not feature an internal o-ring to help further aid in air seal. It is also made of metal and features a spline on top which is presumably for indexing into the hop up chamber – but even with this absent, the nozzle does not rotate due to the stabilization wedges acting against the tappet plate. KWA has yet to inform me as to the specific advantages their air nozzle offers, despite several emails. Conventional internet wisdom will tell you that in order to swap the air nozzle out with TM spec, you will also need to replace the cylinder head, tappet plate, hop up chamber, and of course the air nozzle. All of this in order to achieve the usual objective of gaining an air nozzle with an internal o-ring and to bring things to “TM Spec.”

Real Sword air nozzle on left. KWA air nozzle on right.

Unfortunately the KWA air nozzle is not quite a standard Version 2 gearbox length. Obviously installing too short of an air nozzle will cause extreme FPS loss as the air nozzle is unable to create a good seal against the hop up bucking. Too long will create feeding issues. The trick then is finding one that is “just right.”

I have found that a Real Sword AK Version 3 air nozzle is approximately the same length as the KWA air nozzle. It is also a 95% drop in fit without requiring you to purchase any additional parts. It should be noted that the Real Sword nozzle is not a true Version 3 TM spec either. It’s actually a touch longer than most TM spec Ver. 3 AK air nozzles you will find out there. But for our purposes, that works out really well when you’re going to drop it into a KWA.

Real Sword air nozzle on left. KWA air nozzle on right.

Firstly, you will need to ensure it fits inside your hop up chamber. It may be a little too tight – I tried this across 4 different Real Sword air nozzles and found this to be the case with all of them. If this is the case, then you simply take a bit of fine grit sandpaper and work down the shoulder a bit until the air nozzle fits. As you can see from the above photo, the Real Sword air nozzle has a higher “shoulder” than the KWA one (pictured on right). This is all that really prevents the RS air nozzle from seating fully into the hop up chamber.

Real Sword Ver. 3 air nozzle fitted into KWA hop up chamber. Ideally you should feel a bit of “spring” when fully inserting the air nozzle, meaning that your nozzle is actually engaging the hop up bucking.

Second, check the fitment of the air nozzle to the cylinder head. KWA once again uses some slightly off-spec parts here – you will probably notice the air nozzle fits pretty tight to the cylinder head. The brass shaft the air nozzle rides on is slightly larger diameter than a typical Ver. 2 or Ver. 3 design. As such, you simply have to take your bit of fine grit sandpaper and give it a good polish.

All told, it takes about 5 minutes of really minor sanding and fitting to get this to work properly. Even better, you do not have to replace the cylinder head, tappet plate, or hop up chamber to do this. After installing the new air nozzle I gained about 20 FPS on my setup! I’ve function tested for just over 1000 rounds and so far it has performed flawlessly and maintained FPS. Ideally I will get to test this out further at an actual OP so I can report back on how well it’s working. So far I’m pretty happy with the performance gains though.

And if you’re interested in the custom KWA RM4 build, you can check it out here.

The Difference Between Parts and Spares

Here’s some food for thought….

At the last airsoft event I was asked by a fellow airsofter what spare parts he should consider stocking up on in case his AEG went down.

My reply was, “Another rifle – and preferably one that uses the same magazines.”

Lets face it: digging into a broken airsoft gun is a bit of a process of elimination. 9 times out of 10 it will require you to open your gun up in order to correctly diagnose the problem. In order to do this, you will need a small suite of tools to make it happen. You will need a reasonably clean work surface. You will need parts. Most of all, you will need time. The time involved in tearing open your AEG is time lost during an event. Time lost is also fun lost.

… Unless we’re talking about an ROTC event, in which case time is all you will ever have while waiting for the BLUFOR to engage ^_-

Short of keeping an inventory of absolutely every internal part for your AEG on hand, you may invariably find that you have broken a part that you don’t have in your kit. One possible solution to tackling this eventuality is to have a fully assembled spare gearbox ready to drop in should your primary fail. While I carry a fully stocked array of parts in my war chest, they are primarily there to fix something should all other options fail (including my spare AEG’s.) I generally consider spare parts as something to consider having during large multi-day events. It’s nice to have that type of insurance during down time when you might have the luxury of time to dig into a fix-it project.

But there is a better solution: have a spare gun.

A spare gun is indeed more expensive out the gate, but the time saved by simply switching to your spare is very, very worth it. Some AEG’s failures have the potential to knock you out of the game entirely – especially if you don’t have the parts on hand to fix it. Why let a breakdown hold you back from getting back into the game?

If you’re new to airsoft, and you are looking to buy a spare AEG, I generally recommend that it be as close a clone to your primary as possible. At the very least it should use the same magazines and be wired to have the same battery plugs. There are also a few other advantages to having a clone of your primary:

  1. Simplified logistics. You have one set of magazines that can interchange between the two platforms. This applies to batteries too.
  2. Simplified need for spare parts. At the very worst you can scrap one gun out for parts to keep the other running.
  3. Simplified demands on your load-bearing gear. You do not need to consider an alternate load bearing platform or pouches to carry different magazines (as everything is identical.) This also means less gear to pack.

So in the eventuality that your AEG does go down (and trust me, it will) you can shrug Mr. Murphy off, plug in a battery into your spare gun, insert a magazine, and get back into the game.

– Arkady

You’re definitely going to need more than one of these.