If you know much at all about Angle Of Engagement (AOE) correction, you will invariably know there are two approaches or methodologies to tackling it:
The most popular method is to apply various layers or thicknesses of Sorbo, rubber, or other material to the back of the cylinder head until you’ve achieved proper AOE. This generally takes a bit of time and experimentation to do properly. As a side benefit, you will have gained a modicum of shock absorption for your piston and gearbox.
The second method is to add spacers (such as washers) to the area between the piston and the piston head. In theory, this can solve the AOE problem faster as you do not have to cut or glue any material to the cylinder head. With a simple selection of washers (metal or fiber), you can complete the job in less than a minute.
I do not like 2nd method for the following reason:
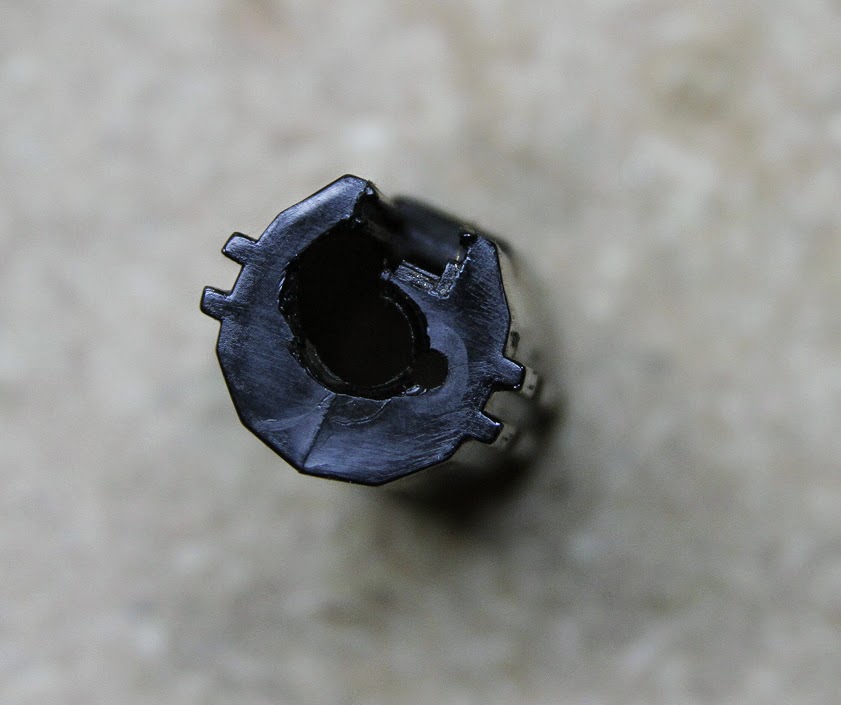
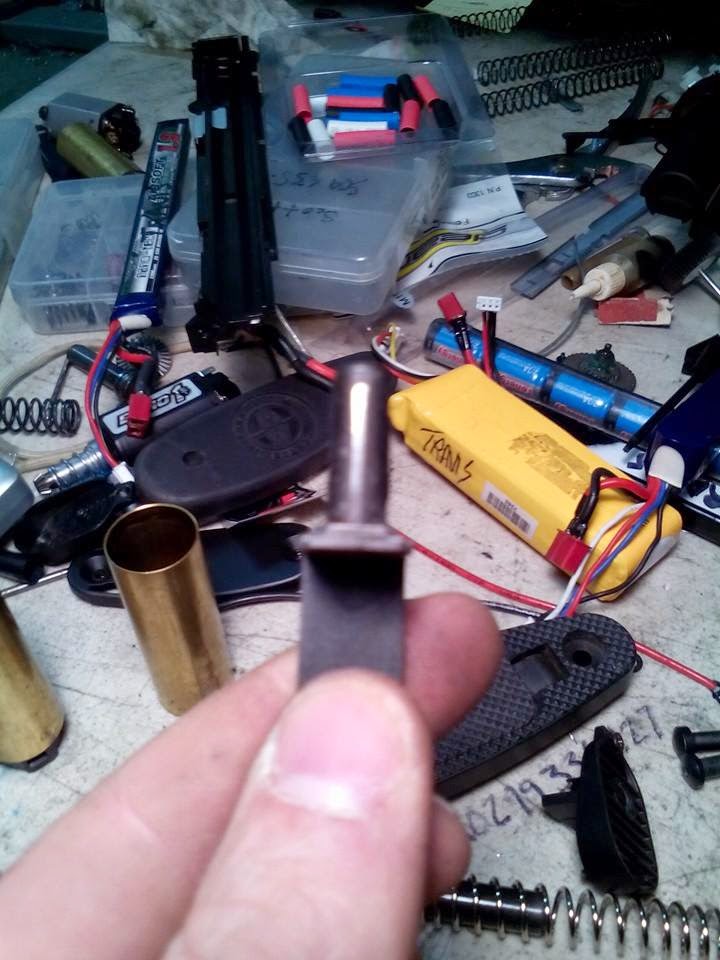
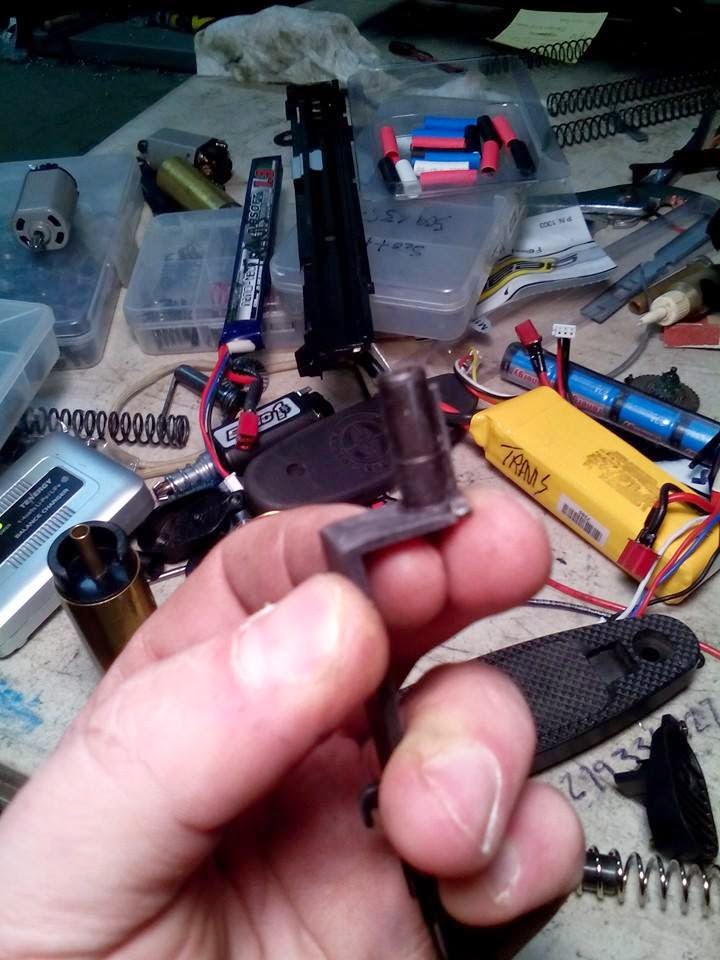
Over time the screw holding the piston head and the washers will loosen ever so slightly causing just enough slop to begin the process of rounding our your piston head indexing hole. If you’ve forgotten to lock-tite your piston head screw down, this can occur in just a few hundred rounds downrange. As was the case with this particular fellows’ AEG – it failed after approximately 6 magazines after they performed the “washer” style AOE correction. In this case, the piston head screw not only augured out a rather wide hole, it busted off the metal rack of teeth from the piston and also cracked the piston head. Due to the sudden severe failure of the piston assembly, I can only conclude this caused additional loading issues as the sector gear and anti-reversal latch were also destroyed in the process.
Daaaayyyyyuuuum!
So your .10 cent washer AOE fix caused close to $25 – $30 in damage plus having to clean out all the shredded polycarbonate out of your gearbox. I have seen this occur quite a bit on washer method AOE corrections, actually. I really do not recommend it. The most likely reason these fail as they do is because once the washers have been added, there is nothing except the screw tension keeping the whole assembly from wandering out of alignment. If you note the design of your piston head, you will see it has a cylindrical piece that is inserted into the piston – this is to prevent it from wandering from side to side. Stacking washers removes this protection and thus you get problems.
In summary – don’t be cheap on your AOE corrections. Put in the time and do them properly. The first method isn’t any more expensive than the second. The only thing it really costs you is time.
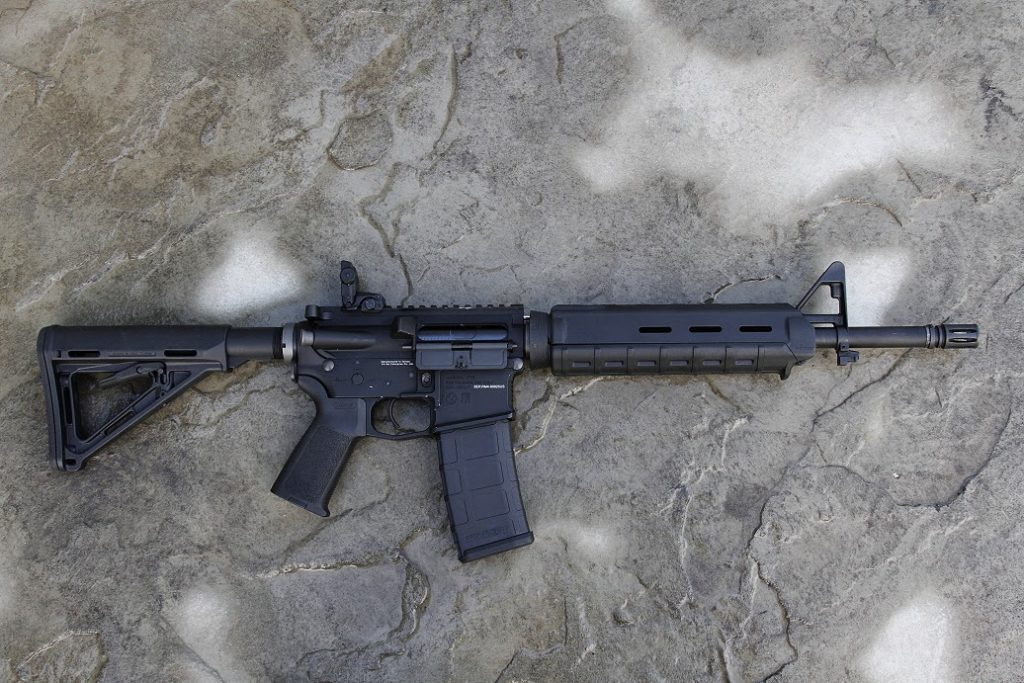
I’ll admit it – I’m not the biggest fan of the M4. I greatly dislike the Version 2 gearbox design, and I hate working on it even more. I’ve broken almost every real steel M4 I’ve laid my hands on, even going so far as to shear a buffer tube completely free of the receiver once. Suffice it to say, M4’s and me have never really
mixed well. I have a lot of experience running the M4 platform, but it would not be my first choice for airsoft use or real steel for that matter. That being said, there is certainly a place for an M4 in the arsenal of an airsofter – even one who does not necessarily like them. It is the most common airsoft rifle around (conversely in the real steel world, the AK takes the top spot as the most prolific rifle found.) And if you do any tech work at all, you absolutely have to know your way around the guts of one. 9 times out 10, someone is going to hand you an M4 to work on. Lastly, I needed a US based weapon for those MILSIM events that are more restrictive on loadouts. While I already own a VFC SCAR that would work for running BLUFOR, my philosophy is to always have backups of backups. One is none, two is one, and so forth…
So what makes this M4 special?
The KWA RM4 is an interesting design from the standpoint of having a recoil engine built into it. KWA calls this the Kinetic Feedback System, which is housed inside the buffer tube of the rifle. Basically, for each trigger pull, the gearbox spring engages the KFS system inside the buffer tube, simulating recoil. It’s not to be confused with other ‘recoil’ designs, such as the Tokyo Marui SOPMOD, or Electric Blowback designs. The KWA does not feature a reciprocating faux bolt, nor does it have any linkage, springs, or armatures linked to a bolt. Having owned some EBB designs, I can attest that the RM4 probably produces the strongest recoil evidenced from an AEG to date. You have to shoot it to believe it, and once you do, you’ll be smiling, because it is a blast to shoot.
Another nice feature is the mechanical bolt release. Upon firing the last round from the magazine, the gun will no longer fire until you insert a fresh magazine and hit the bolt release or the charging handle. This is another cool touch for the realism department. There are two barrel lengths available – the standard 14.5″ and a 10″ length. Both are a straight profile heavy-weight design that have a standard triangle front sight attached. The gearbox is KWA’s branded “3GX” design, which is really just saying it’s a modified Version 2 (or in KWA’s case, a 2GX.) The major modification is the back of the gearbox shell is missing to allow the spring to engage the KFS recoil system. By simply removing the castle nut and unscrewing the buffer tube, this rifle also effectively has a quick-change spring system – in other words, no disassembly of the gearbox is required to swap springs. Unfortunately, KWA in all their vast intelligence, did not make the castle nut remotely close to spec. Your average AR-15 castle nut wrench simply won’t fit. I wound up resorting to using an M14 gas block removal tool to unthread the castle nut. In the future, I would see if swapping a real steel castle nut onto there would be possible, as this would greatly expedite takedown procedure.
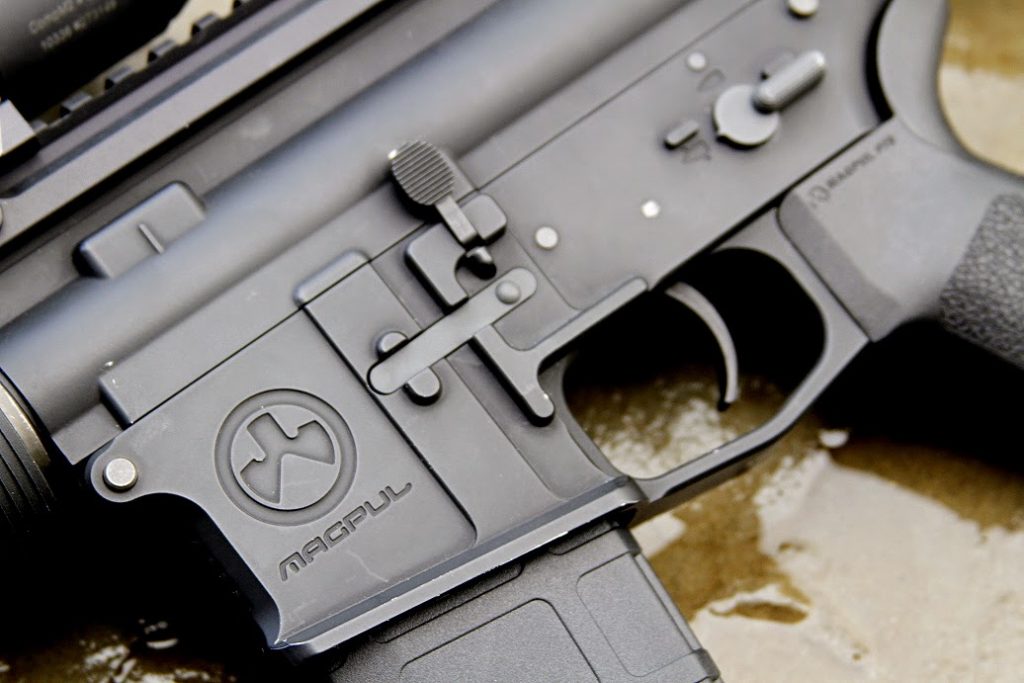
Magpul… Magpul everywhere…
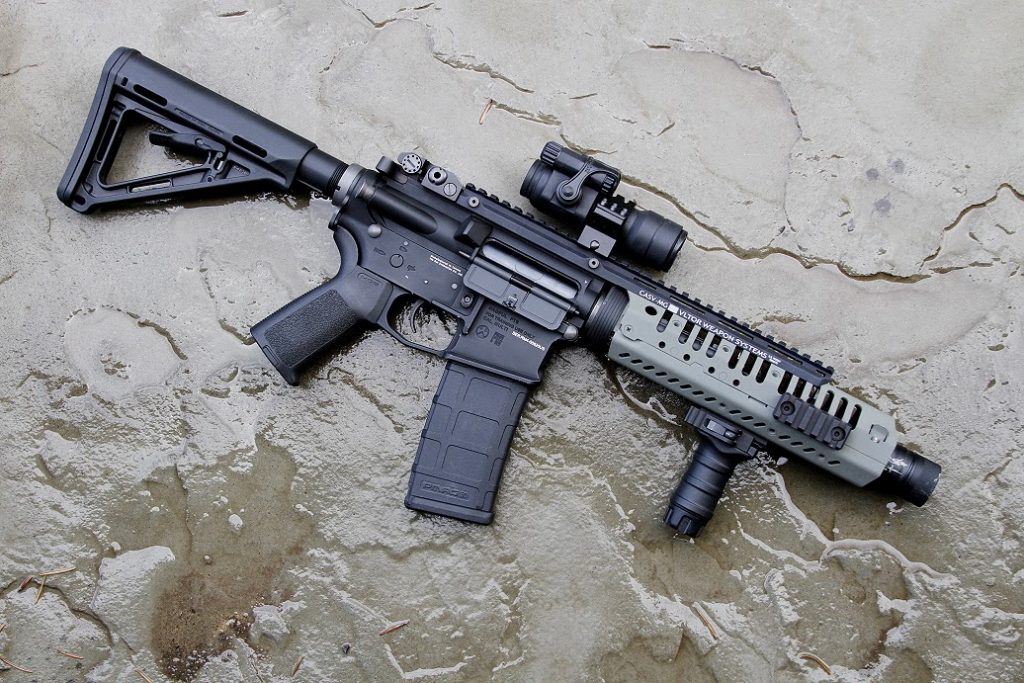
The RM4 is reputedly the last collaboration between PTS and Magpul before they split, so as such, it is decked out in full Magpul / PTS regalia. This also includes the lower receiver which is embossed with the Magpul logo and trademarks. While this won’t please AR puritans who desire a military spec receiver to build their Mk. 18’s and so forth, it doesn’t look unattractive. Magazines are PTS brand and have the ability to take Magpul Ranger Plates. They also feature a nifty switch that allows you to set the capacity at 30 or 60 rounds, which is a big savings if you’re the kind of guy or gal who buys both real caps and mid-caps. You can, of course, run any other brand of M4 magazine as well, but you will lose the last-round cutoff feature.
It should be noted that the only place to house a battery on this beast is inside the handguard or via a PEQ box. With some engineering it would be possible to rear-wire the RM4, but I don’t think it’s worth pursuing that route as then you’d be stuck running a fixed stock or the ugly Crane stock that’s found on 99% of M4’s. One of the things that made the RM4 attractive to me was the option to run any stock configuration I liked. As I don’t care for the Crane stock myself, this was a very big plus in my book.
While the PTS MOE handguards are nice and big enough inside to house a rather wide variety of batteries, I decided it wasn’t really the ‘look’ I wanted, so as such, this would be the first thing to be replaced.
Changing things up
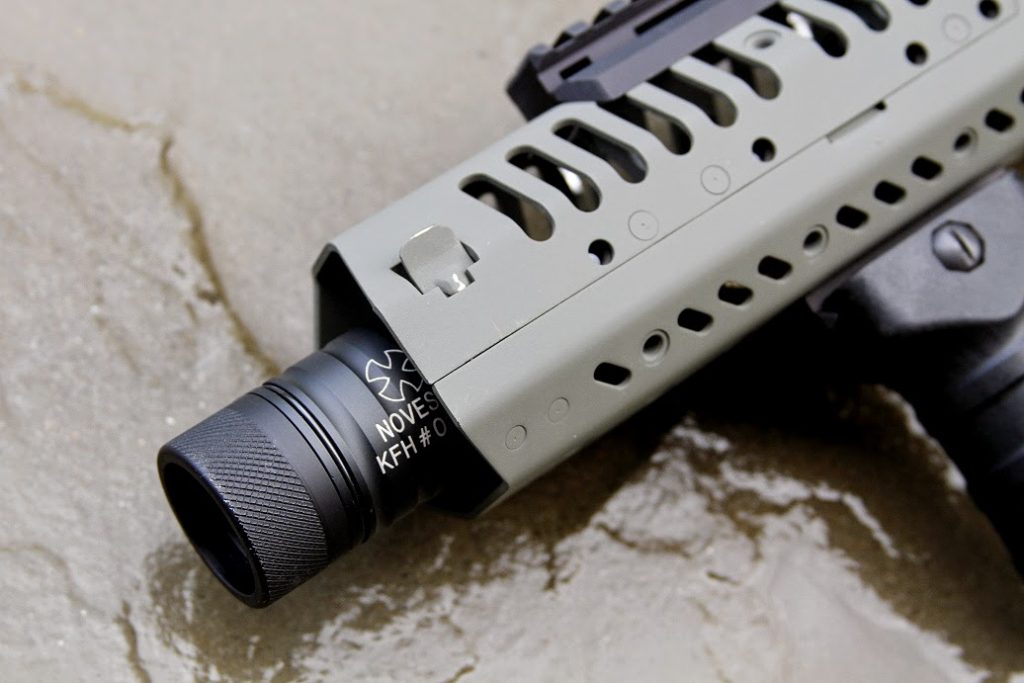
The first determination was deciding on barrel length. My idea was to evolve this rifle into a dual-purpose weapon that could work in the CQB realm as well as the field with just a simple spring change to handle the FPS side of things. A 14.5″ barrel can be made to work in tight quarters, but shaving a few inches off certainly goes a ways towards making things more compact. I’ve had a Noveske Fire Pig rolling around in my parts bin since forever, and it was while looking at this that I decided to go with the recessed muzzle device look. Plus, with the cones removed inside, it makes it extra loud – always a cool thing, especially indoors. Most handguards are around 9″ in length, so to achieve a recessed look, you need a barrel with something around 7.5″ to 8.5″ (max) length.
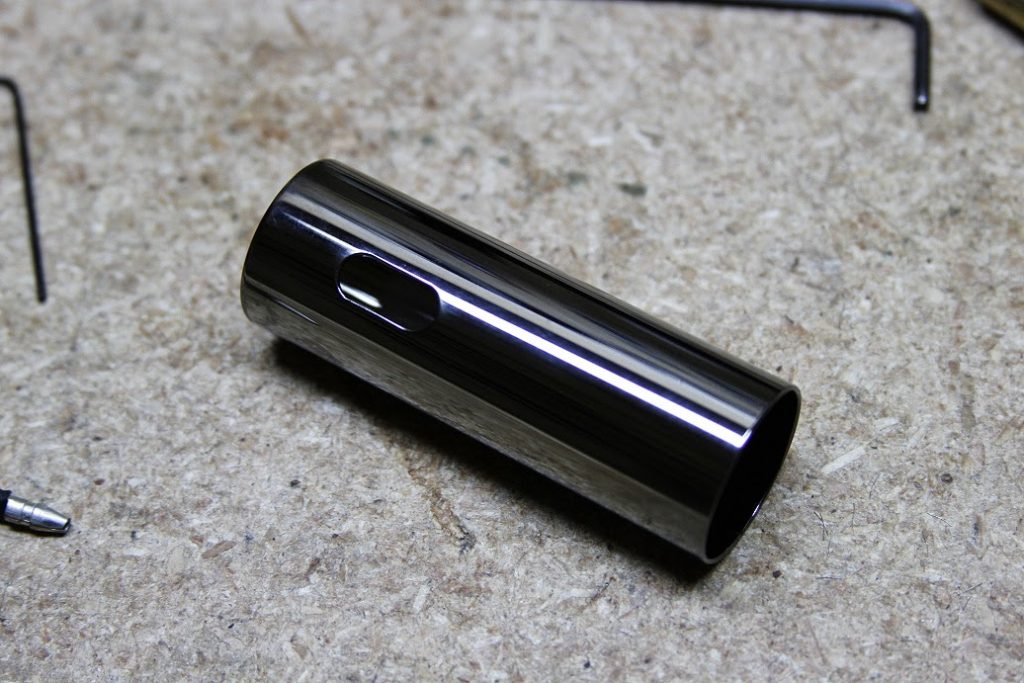
A new cylinder is necessary to correctly match your air volume to barrel length.
Tracking down the correct barrel length was a bit of a hassle. Nobody regularly stocks sub-10″ barrels for an M4, it seems. I wound up spending a little more than I wanted and purchased a Noveske 8.5″ heavy-barrel, as this was the only thing in stock at the length that would work. 8.5″ would also give me a bit more room for the battery. My favorite Prometheus 208mm 6.03 EG Stainless steel barrel was also ordered in addition to a new 3/4 ported cylinder. Guarder makes a really nice brass cylinder coated in something called “Super Lucid Chromium Plating.” It’s slick as butter and finished out very nicely. When I say slick, I mean it. If you have the slightest bit of grease on your fingers, you’ll be dropping this thing … a lot. It should be noted that the KWA barrel nut that keeps the stock barrel attached is extremely tight. It was a real b!tch to remove….
The final touch would be a new handguard. Initially I considered a low-profile Keymod system. Slick and clean, but battery space would be virtually non-existent, thus necessitating a PEQ box. I’ve yet to have a PEQ box last one or two games before dying an unglorious death, so this effectively nixed the Keymod rail idea. Doing some lengthy browsing on M4 picture threads on various forums, I came across the VLTOR CASV system. This looked to have lots of room inside for a battery and has a very good reputation for long term durability… lets try it!
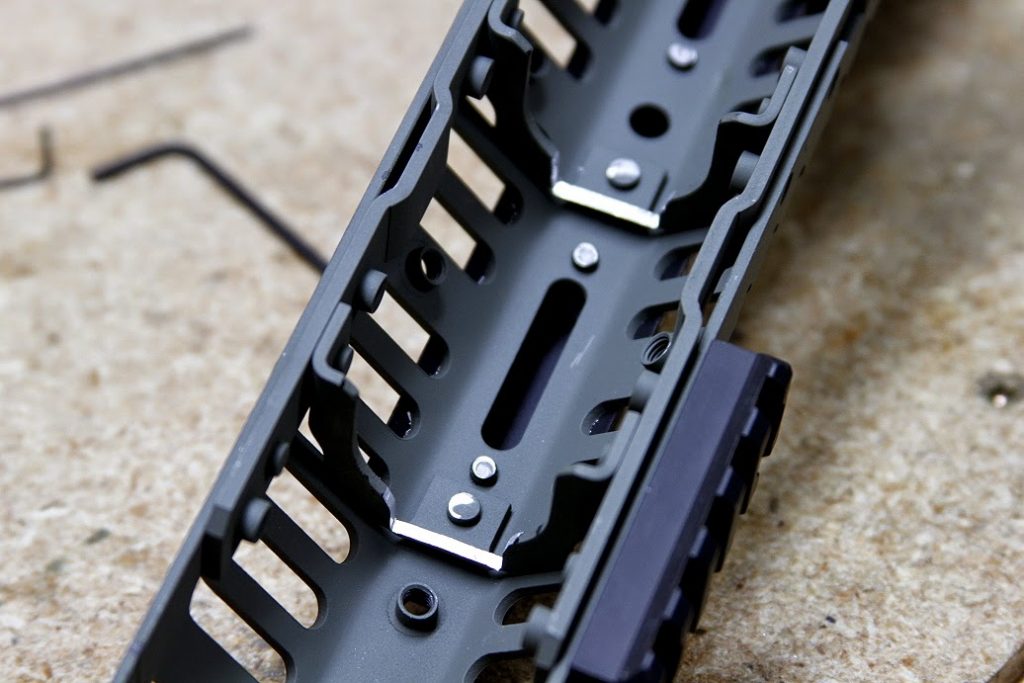
The VLTOR CASV was originally developed for a Navy EOD contract. Due to that, it reputedly enjoyed a brief flurry of popularity in airsoft circles before being superseded by rails made for SOCOM contracts. Yeah, airsoft has its fads and trends, just like fashion. The cool thing about the CASV, is it is a slick rail system that allows you to place rails where you want them. Technically, it was probably the first truly slick rail system built (way before Keymod), if memory serves me correct. I decided to buy the real steel VLTOR system rather than the airsoft copies, based mostly upon largely negative reviews concerning the copies.
Installation of the CASV was ridiculously easy. Simply remove your old handguards, slide back the delta ring, slide on the CASV, let the delta ring come forward, then attach the receiver rail clamp. It can be done in 10 seconds flat and is absolutely rock solid.
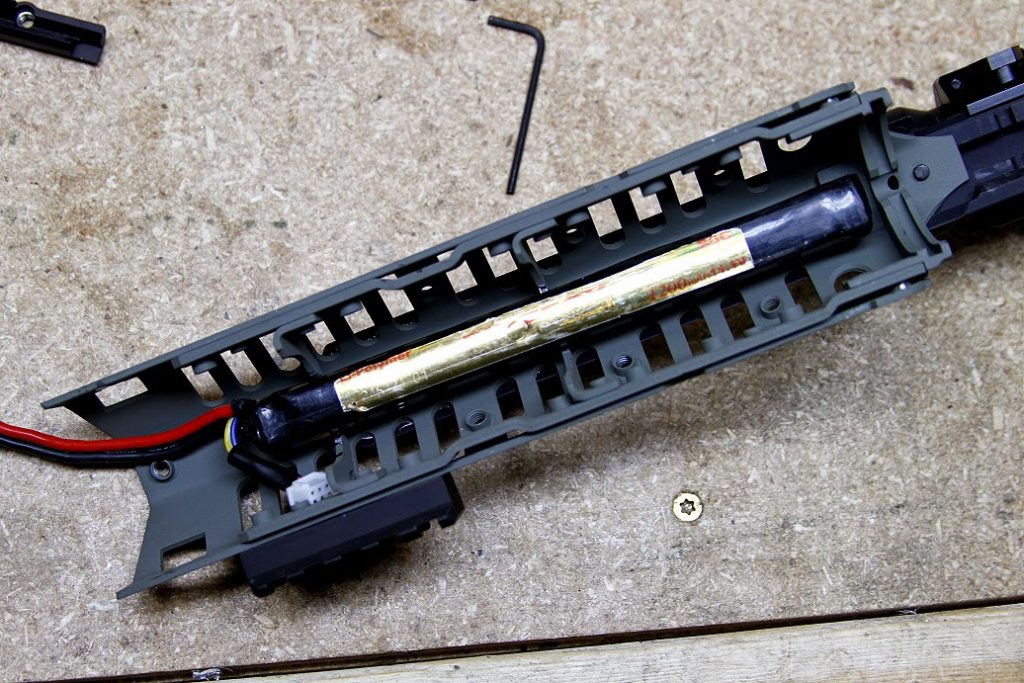
Minor modification to the CASV was necessary to ensure the fitment of a battery. In this case, I would be using 11.1v 1200mah Firefox stick LIPO’s. I used a milling bit to grind
down two of the supporting flanges (it’s still hellaciously strong) so
the battery could ride on top of the barrel. The battery is retained by the Noveske Fire Pig, which prevents it from falling out the front of the handguard when the muzzle is pointed down. Overall it fits perfectly, with no external wires or need for a PEQ box. Mission Accomplished!
The 8.5″ barrel length proved to be perfect for achieving the recessed look I was after. In retrospect, it would have been nice to have had the option for a slimmer profile and perhaps a black finish, but it works good. It was necessary to mill a wider slot into the top of the barrel where the hop up arm assembly rides. Without doing this modification you will not be able to install an aftermarket barrel in the KWA RM4. Just another thing in a list of things KWA chose not to build to spec.
Summary While it looks damn cool, it’s definitely not particularly cheap to achieve a shorter barrel length in the RM4 (and quite possibly any M4, except those that come built that way.) Factor in the following for this build as an example:
8.5″ Noveske Barrel – $45
Prometheus 208mm 6.03 EG TBB – $55
Guarder Super Lucid Chromium Plated Cylinder – $12
Noveske Fire Pig – $35
VLTOR CASV-MX – $160
Total = $307
Not including accessories such as optics, foregrips, BUIS, etc. In the end, you could buy a real steel M4 for the same price. But that’s the price of doing business, as they say 😀
Real steel Aimpoint CompM2 and Tango Down stubby VFG coupled with some new BUIS completes the package (almost – need to buy the front sight still.)
Often you will get low chronograph results with your stock KWA air nozzle. Most believe this is due to a lack of a sealing o-ring inside the bore of the nozzle. This is not always the case as sometimes the nozzle will seal decently well on the cylinder head. What can be the problem is when the air nozzle does not engage the sealing surface fully. Here is a small and easy-to-do modification:
Take a Dremel or grinding wheel and remove .5 millimeter of material off the end of your tappet plate as shown.
Do the same to the stabilization wedges on the air nozzle in photo 2. These wedges are contacting the gearbox extensively on a small area in the nozzle cutout on the gearbox.
Often you will need to remove a small dip in the blade of the tappet plate to allow the sector gear axle to properly fit, thus allowing the tappet plate to move forward more as well.
In my experience this mod can deliver 20 to 50 fps depending on the quality of modification and applications.
Remove material from the front face of the tappet plate and the stabilization wedge that hooks into the top of the air nozzle.
 Over time the screw holding the piston head and the washers will loosen ever so slightly causing just enough slop to begin the process of rounding our your piston head indexing hole. If you’ve forgotten to lock-tite your piston head screw down, this can occur in just a few hundred rounds downrange. As was the case with this particular fellows’ AEG – it failed after approximately 6 magazines after they performed the “washer” style AOE correction. In this case, the piston head screw not only augured out a rather wide hole, it busted off the metal rack of teeth from the piston and also cracked the piston head. Due to the sudden severe failure of the piston assembly, I can only conclude this caused additional loading issues as the sector gear and anti-reversal latch were also destroyed in the process.