Air Nozzles, and how they affect your accuracy

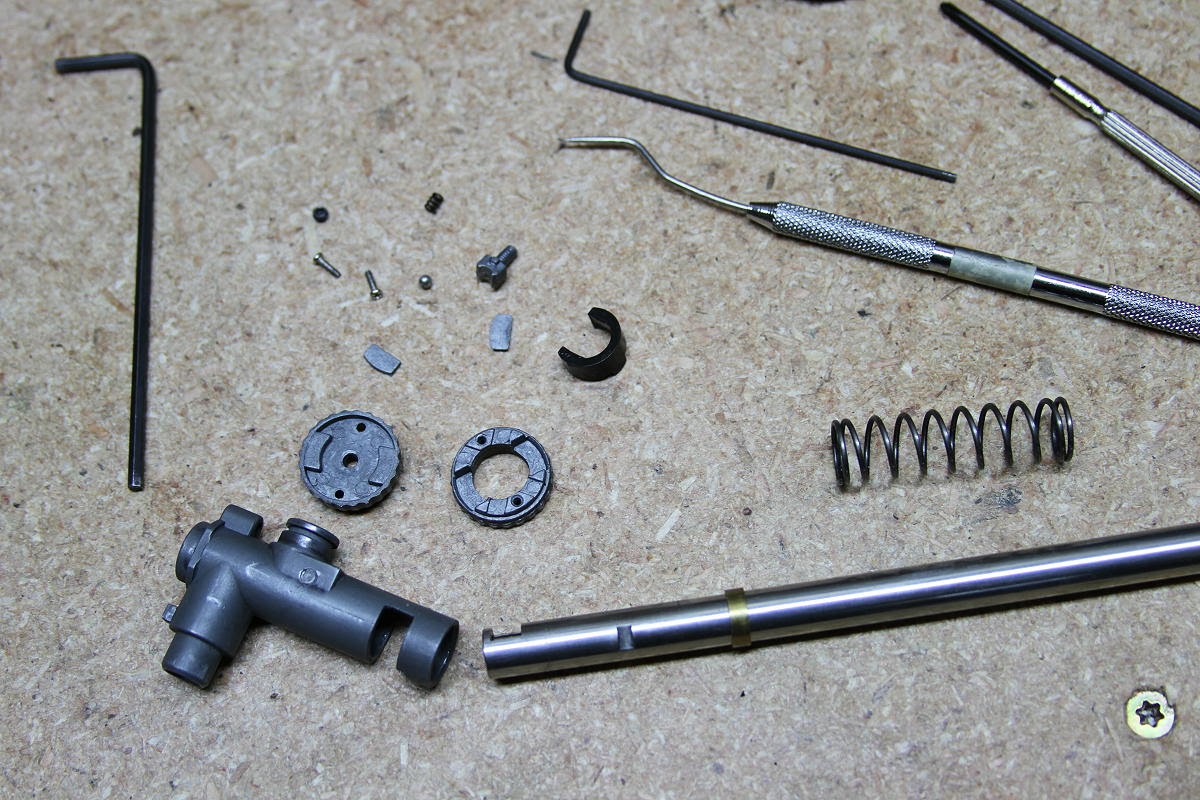
One of the often overlooked factors in airsoft accuracy is the air nozzle. The air nozzle allows the air from the cylinder to power the BB, which is then fed directly into the hop up chamber, rather than what is mistakenly assumed to be solely the gearboxes’ doing. Additionally, it must be understood that the air nozzle makes up another crucial aspect of your gearboxes overall compression. Depending on the type of compression issues you might be having, the air nozzle is also one of the things you should look at.

If you’ve ever been at an Airsoft OP and suddenly your AEG starts shooting extremely low and short even though shortly prior to this it was shooting long and far with the hop up adjusted perfectly…. Then you should take a hard look at your compression. Chances are, you’ve got a broken nozzle, or a cracked piston head, cylinder head, or a blown piston o-ring – or if it’s your lucky day: all of the above ๐Ÿ˜€

Lets briefly cover air nozzle compression checking because that’s a necessary primer for diagnosing most common air nozzle issues:

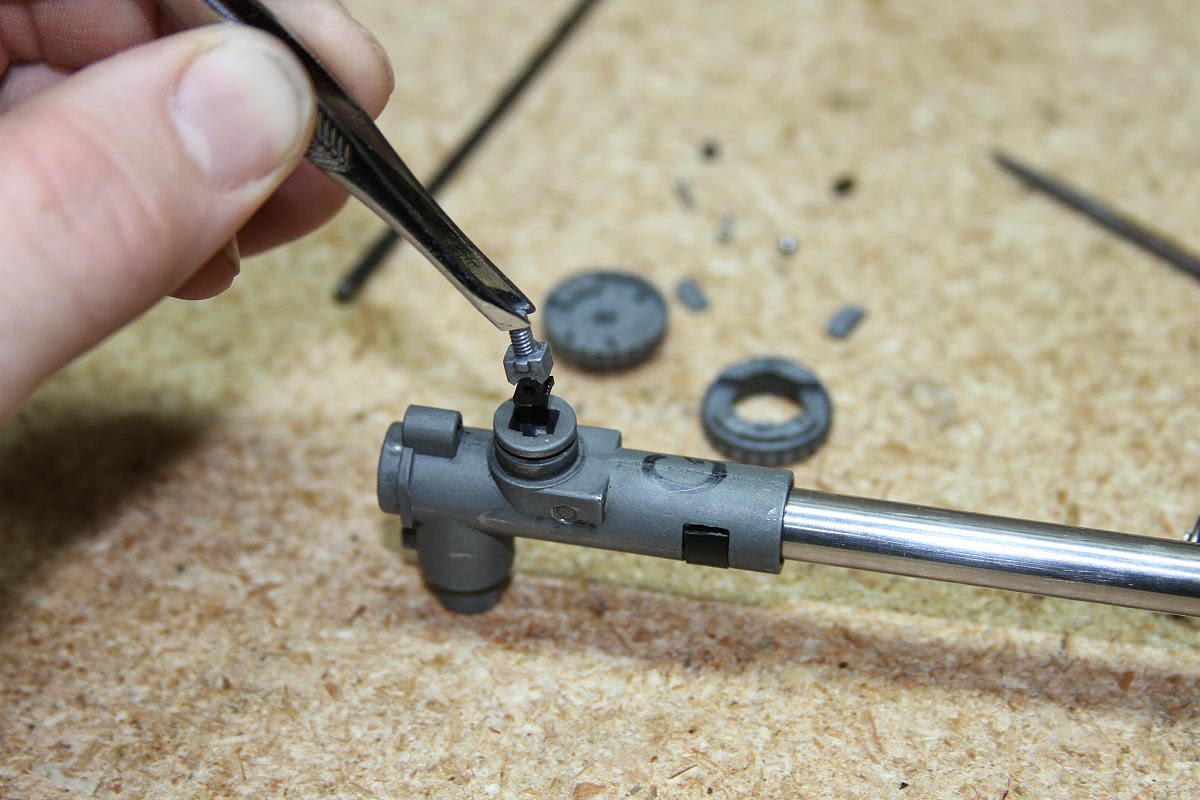
1) As mentioned, it is important when checking compression that you also check it with the air nozzle affixed to the cylinder head and held in the forward position with the tappet plate. You can do this several ways, including placing the whole assembly in a gearbox half if that works for you (this also shows you where things should properly line up and is a more accurate method vs. clamping everything together with your hand.) As with all things gearbox related, it helps if you have three hands. You should meet good resistance when trying to compress the piston inside the cylinder. Do not force it, but simply apply good even pressure to determine if you have any air leaks. This is also your opportunity to determine where the air leaks may be occurring. If it’s around the cylinder head area, I typically swap the piston o-ring out, and re-check. If it’s still no good, I will swap out the cylinder head o-ring. That usually solves that area unless I have a bad cylinder, broken cylinder head, etc. Follow this up with the air nozzle compression check. Make sure to apply a bit of grease around the cylinder head and piston o-ring when checking. Do not use any grease on the cylinder head nozzle shaft, or the air nozzle itself. These areas work best dry. If you do lube this area, chances are it is going to get blown into your hop up chamber or on your BB’s, thereby fouling your barrel and buggering up your accuracy.

If you’re losing air through the air nozzle, this can be caused from any of the following:

  • If it’s a new gun (albeit a cheap one) – it’s probably a crappy air nozzle and doesn’t create a good seal.
  • If it’s a well used gun (cheap, expensive, or otherwise) – it’s probably a worn out air nozzle.
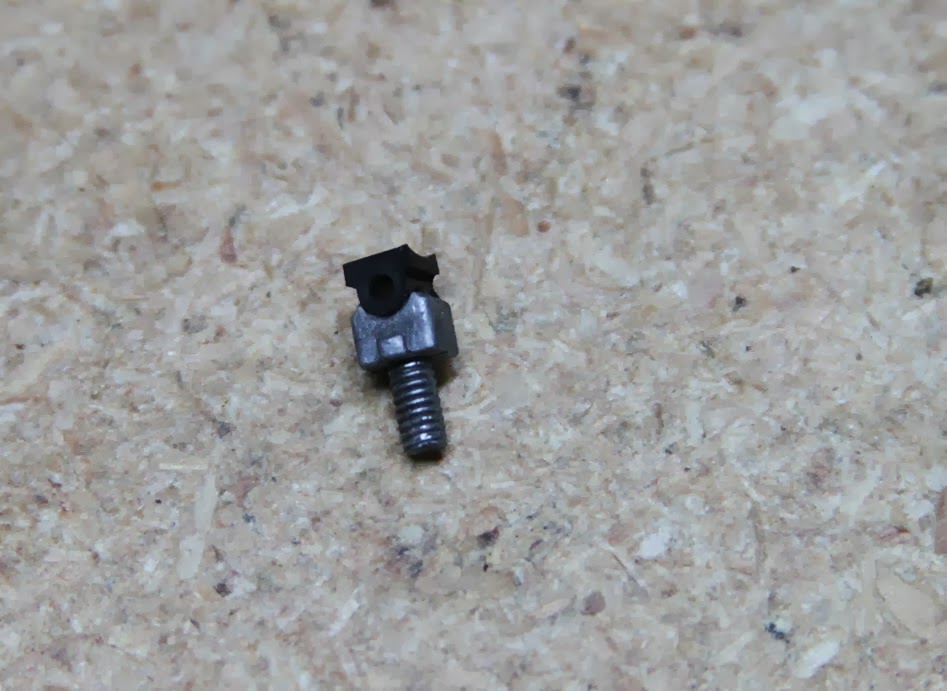
  • If it’s cracked, chipped, deformed, or damaged.
  • If it’s missing any of the internal o-rings.

In any of the above cases, the fix is simple: Replace the air nozzle.

Regarding the o-rings found on most air nozzle designs – these are tiny and small, and aren’t especially easy to replace or find suitable replacements for. I recommend that you replace the air nozzle altogether. Generally speaking, if the o-ring(s) go, then it’s a good indicator that the rest is about to go too.

2) An air nozzle is a worthwhile upgrade, especially if you buy a good one. There are various designs out there and most are gearbox specific. I typically prefer ones that have one or more internal o-rings for best performance. I have yet to see any real advantage to the various odd-shaped cut-out designs on the nose of the air nozzle (rather the contrary, in fact.) Personally, I go with a nice round hole design as I feel this sits against the BB the best, it too being a round shape. I also prefer polycarbonate / plastic to metal nozzles as I feel it is less wear and tear on your cylinder head and hop-up assembly (bucking too.) Do not use a “Bore Up” style nozzle without having the rest of your bore up components too. This includes a bore up cylinder and piston head, and lastly a bore up cylinder head. If you don’t have these other parts, you will have FPS loss.

3) It is vitally important that you buy the correct size air nozzle for your AEG. They are not one-size-fits-all, or universal in the slightest. Dial calipers are your best friend. Measure the length and purchase accordingly. If you have too short of an air nozzle, it will not make a good seal against your hop up bucking and you will lose massive compression this way (40+ FPS or more). Massive compression loss also means massive accuracy and range loss. Too long of an air nozzle and you will have equally detrimental issues, most of them within your gearbox where it can get expensive. It is in this realm that you can see how big of a role the lowly air nozzle plays in the accuracy department.

Oh, and lest you’ve all forgotten: Do not, I repeat, DO NOT USE TEFLON TAPE to fix compression issues unless you enjoy binding your gears up, and/or cleaning nasty oozing gunk that looks like an excellent analog to dirty pus out of your gearbox.


4 Years with the KWA USP Tactical

It’s been approximately four years since I bought my first KWA USP Tactical. In my opinion, a review
on an airsoft gun doesn’t really count until you’ve really put it through its paces. Admittedly, four years is certainly a lot longer than most individuals take when doing a gun review. I blame this mostly on the lack of time to put forth a review sooner. However, I do find it hard to place a lot of credibility on a review when all the end user has done is take it out of the box, remarked on its cosmetic features, and maybe its gearbox performance, and maybe run a magazine or two through it. Never mind that they seem to spend an inordinate amount of time on the appearance of the box itself, as though that is an important buying decision in and of itself (hah!)

In truth, it is only through actual hard use that you will completely determine how something will hold up over time. Some problems manifest themselves immediately out of the box, some take days, or weeks, or months to crop up. So to me, four years of hard use is certainly more than satisfactory enough to remark on the durability and performance of the KWA USP Tactical.

Features

The KWA USP Tactical for those who don’t know is based on the famous Heckler & Koch USP Tactical chambered in .45 ACP made in Germany. As far as appearances go, the the KWA closely replicates the look and feel (albeit not the weight) of the real USP Tactical reasonably well. There are some minor differences, but overall the effect is achieved. My version is an older one before they used full HK trades. As such, it bears the KWA logo across the slide. KWA utilizes the NS2 gas system in all their pistol designs. The NS2 system has a two-stage internal expansion chamber that delivers gas more efficiently. This design has facilitated faster cycling and harder recoil; both of which are nice to have features in a pistol designed to mimic realistic function.

The KWA USP Tactical features a single and double action trigger with an over travel adjustment. Adjustable sights are standard, and are nice and tall in order to clear a variety of suppressor styles. The magazines hold 25 rounds, and comprise the bulk of the pistols weight. The KWA also sports fully ambidextrous controls (minus the slide release). The safety also functions as a decocker, allowing you to carry the pistol “Cocked and locked” in similar fashion to a 1911. The magazine release is ambidextrous and functions very differently than a push button style magazine release does. Some folks hate the magazine release and it is a point of constant contention with them. For the most part, I would say this is due to operator failure and unwillingness to adapt and learn a new system. To properly operate the magazine release involves simply pressing down with your trigger finger. No rotation or futzing of the grip is required. Once you learn the technique, you can accomplish a reload and get on target a lot faster than a push button release. Having run various H&K pistols for the last 10 years now, I feel this style of magazine release is vastly superior to push button releases. A well versed individual would of course school themselves on both styles and train with them accordingly. That is of course personal opinion, so take it for what it’s worth.

The one drawback I do feel this pistol has is with regard to the proprietary rail system. The USP Tactical does not use a picatinny rail style interface. There are workarounds to this, of course. Surefire and GG&G both make rail adapters, with the latter being the lowest profile and better one. These allow you to use essentially any light or laser on the market that is designed for a picatinny rail. Alternatively, one could always use light/laser units designed expressly for the proprietary rail on the USP, of which there are many to choose from. The Laser Devices Blast 2 unit being my personal favorite. If you do not use a laser or light, then this shouldn’t be a concern for you. Additionally one must consider that the varieties of holsters available that support a dedicated weapon light are few and expensive.

Modifications

My first task upon purchasing the pistol was to remove the orange from the muzzle. Admittedly, this isn’t at all easy to do. The plastic outer barrel is not of a ‘solvent resistant’ plastic blend – thus using any sort of solvents or cleaners in an attempt to remove the orange paint results in melting the barrel. No matter… I simply cut the threads off, gave it a quick polish and cleanup with a file and sandpaper and it was good to go. KWA offers an aftermarket full metal outer barrel that does not feature the orange threads, but does not recommend or endorse it due to it “shortening the lifespan of the pistol.” A metal barrel would be the ideal solution for folks who like to run suppressors versus the plastic barrel, which is known to snap off with heavy weight.

This is her good side.

Sometime later I wound up giving the internals rails of the slide a nice polish, removing any finish and rough spots. I also polished the area around the inside of the muzzle. This is not a necessary step, actually. The KWA will run just fine without a polish. My goal was to simply make as smooth an operating environment as possible for the pistol. I also modified the sights a bit with a drill bit to make a small concave hole that I filled with white paint to get a 3-dot style system set up and to make the sights more visible in low light conditions.

A note on the sights: contrary to the standard UPS, the USP Tactical model features quite tall sights. These are tall on purpose, and are designed to allow sighting over an affixed suppressor. As such, you may notice at closer ranges that you are shooting a little low when aiming dead on target. This is because the sights are taller than the bore axis. Simply aim a little higher and you will hit dead center. In truth, I feel this pistol is optimised for shooting at longer ranges (at 35-50 feet you will hit straight and true.)

Performance and Accuracy

Slow n’ steady.

My only other modification to the pistol was the installation of a Precision Combat Technologies 6.01 tight bore barrel. While the stock KWA barrel was satisfactory in the accuracy department, I felt the pistol could honestly do better. With the PCT barrel and using a stock hop up, I can obtain quite accurate groupings at all ranges. I typically shoot .25g Biovals from this gun. Average velocity with .20g BB’s has remained a relatively constant 345 FPS over the past 4 years. That this pistol has maintained its same level of FPS out of the box over the course of four years is pretty impressive to say the least.

Chain lightning!

Shooting in fast rapid fire, the groups obviously open up a bit, and you will also notice the cooldown effect of the propane as the latter shots start to lose altitude and begin to group low. Still, this is a satisfactory group and will certainly make someone on the receiving end unhappy.

Disassembly and maintenance is sublimely easy. I have, however, never completely detail stripped this particular weapon as I have never had need or occasion to. I intend to do this within the end of the year, however, mostly to sate my curiosity. The one time it took a particularly nasty bath in the sand only required me to open the slide and swish her around in the river some before returning her to service (that was 3 years ago now.) I have yet to replace a single part internally or externally, save for a hop up bucking that I damaged while installing the barrel. The sights have held their zero perfectly and haven’t worked loose or fallen off.

KWA’s finish isn’t especially known for being high quality or durable in the long term. I’ve evidenced a lot of holster wear on the front end especially. One thing to note with it being an aluminum slide: on the areas that have the finish completely gone it can be prone to minor aluminum oxidization if you neglect it after a high moisture environment. Wipe it off with and it’s good to go again. I suppose I could refinish the pistol in the future, but provided one stays on top of it as you would with any sidearm, it isn’t a big deal and I think the wear adds to the character.

The polymer frame has been quite durable and tough. I have zero complaints regarding this aspect of the pistol. There are some nicks and scratches here and there – mostly on the right side of the pistol grip – but it doesn’t affect the function of the pistol in any form. The magazines have held up very well (I own five of them), including being intentionally dropped on the ground. I’ve never replaced an o-ring, had to fix a valve, or do anything other than regular maintenance with silicone oil and cleaning.

I’ve fed this gun a steady diet of propane gas (with a few drops of silicone oil added every 3rd mag fill) and it has functioned flawlessly and without hiccup every time. I’ve fired countless bags of ammo through her of every variety and brand and she’s ate it all without complaint. She’s been dunked in water, sand, mud, and dirt, drug through the bushes and smacked against trees. There are dings and scratches and finish wear. For most of her life she’s ridden in a modified Safariland 6004 series drop leg and has never once worn a lanyard or been lost due to faulty holster design. She’s been a trusty and faithful backup any time I needed her. I have little love for KWA’s AEG’s, but much respect and love for their pistol designs as they’ve all been quite reliable and rock solid for me.

Cat fight!

The New Girl

Recently I purchased a KWA HK45 Tactical – the newer, younger heir and successor to the USP lineup. The ergonomic and feature improvements are readily obvious and this pistol feels incredibly comfortable in my hand. For the immediate future, my USP Tactical will rest on the shelf for the most part while I run the new pistol through its paces. Time will tell how well – and if it will hold up as well – as the USP Tactical has.

Raptors Airsoft Maple Leaf RTX Hop Up Bucking Review

Raptors Airsoft is a relatively little known hop up bucking option for airsofters. In a market already flooded with options, it can be hard to decide which bucking is the best for you and your setup. With this review, we will discuss one of the reputed “best” options out there – the RTX Maple Leaf hop up bucking and nub.

This hop up bucking best falls into the category of “flat hops.” A flat hop differs from a traditional hop up bucking and nub in several ways – in the case of the RTX, it features a specially formed and curved nub that is designed to form to the outside surface of the bucking. The bucking itself has a unique triangular shaped contact patch that provides a greater surface area for the BB to ride against. Another obvious feature is the ribbed outside (not for her pleasure) designed to enhance your hop up’s air seal. In this regard alone, the RTX hop up fits very snugly inside the hop up chamber, and performs it job admirably well.

Close up of the RTX nub.

This unit would be installed in a Real Sword Dragunov SVD, currently chrono’d at 500 FPS and featuring a Prometheus 590mm 6.03 EG stainless tightbore. As always, testing BB’s are Bioval .30g’s. For testing and evaluation purposes, I selected a 60 degree hardness RTX hop up and nub. I generally prefer a slightly softer hop up rubber versus a harder one, mostly due to cold weather variances and their effects on synthetics (the colder it gets, the harder the rubber.) In a dedicated semi-auto only weapon, this makes more sense because you’re not going to be generating as much friction and heat in your hop up chamber as you would through full auto. As such, your hop up bucking is going to be operating at a colder temperature than a typical AEG.

Close-up of RTX contact patch. Image courtesy of Raptors Airsoft.


Installation is slightly more complex than a traditional bucking is. In brief summation, it requires you to completely disassemble your hop up chamber. You will not be able to approach this in any other fashion other than complete disassembly. This is entirely due to the design nature of the nub itself, and the tighter tolerance of the bucking too. The Real Sword SVD hop up chamber is a more complex beast than most, but it does offer very precise micro-click adjustments so you can really fine tune your hop up. I actually feel this is a good system to use with the RTX hop up, because the RTX seems to be more sensitive to its adjustment than traditional hop ups are.

While I had the hop up chamber disassembled, I took the opportunity to give the nub arm a little polish with a round file to remove any burrs and molding marks. Not a very necessary step, but it looks pretty. In the photo on the right, you can see the best method for installation of the nub. Take a very small dab of silicone grease, place it on your nub arm, and apply the nub. The allows you to easily drop in the whole assembly into your hop up chamber without losing the nub. You can use this method with any Version 2 or 3 hop up arm assembly as well.

An important step to remember is that you already have installed the bucking on the barrel and inserted it into the hop up chamber. If the bucking is really tight, I find a little bit of synthetic valve oil works well for sliding it in. This is the same stuff as sold for musical instruments, such as trumpets, saxaphone, etc. It works very well, and will evaporate off within a day or so without leaving a residue or contamination. I have been using the same 8 oz. bottle for over 15 years now, and I’m probably 3/4’s of the way through it now . . . so it goes a very, very long ways.

Drop in your nub and arm assembly from the top, close everything up, check for function and ensure that you have installed the bucking correctly (make sure it isn’t protruding into the feedway area, or that it isn’t interfering with the barrel retainer clip), and take her to the range for testing.

Range Report

So how does it perform? As I’ve mentioned earlier, the RTX hop up seems to require a more precise adjustment than a typical hop up bucking does. The Real Sword hop up chamber really shines in this regard because it allows for very precise adjustment. While I have had very good luck with Version 3 and 2 installs using the RTX hop up, it requires a more careful hand, otherwise you can overshoot or undershoot your hop ups’ “sweet spot” and have a bad trajectory. This is not a hop up unit for those who don’t pay attention or aren’t devoted to tuning.

Onto performance: After dialing the the hop up, I had to readjust the POSP scope reticule to where the BB’s were now shooting. Range-wise, I was achieving at least an extra 20 yards over the stock hop up bucking, with a much flatter trajectory. Accuracy was also much improved, with a noticeably tighter group than stock performance. 100 yard accurate shots were a breeze, offhand, prone, or supported. Of interesting note, it was possible to over-dial the hop up to where the BB’s curved quite high about midway out (60-70 yards range), but flattened out slightly afterwards to fall in a slow downward trajectory, thereby extending my total effective range even further (estimated 110 yards perhaps.) The only drawback to over-dialing like this is that one would have to aim quite low (as in at the feet of your opponent) to affect a center-mass hit at the 60-70 yard range, which makes it pretty impractical for closer shots. Our local fields’ minimum engagement range for sniper weapons (anything over 400 FPS) is 50 yards, so I typically prefer to zero my shots to hit dead on at 50 yards, and adjust for elevation at longer ranges. With a 4x scope, spotting where the BB’s are going at 110+ yards becomes a tad bit difficult (especially against a backdrop of endless pine tree’s.) I can, however say with confidence that effecting solid torso hits at 110+ yards is wholly possible if you know what you are doing and are willing to account for a few missed shots.

Chronograph readings showed a decent FPS gain of around 12 FPS +/- 1, thus reaffirming the quality of air seal the RTX hop up provides.

An important note: range and accuracy gains are a bit of a subjective matter – insofar as every AEG is unique and thus every AEG will behave and shoot differently. A lot depends on your gearbox setup, compression, shimming, barrel quality, etc. I have achieved differing results installing the RTX on a Ver. 3 AK – albeit still very positive and gainful results.

Summary

Overall, I am moderately pleased with the performance of the RTX bucking. The main advantage of the RTX over other “Flat hop” designs, is its pure drop-in fit – meaning it does not require any modifications or alternations of your barrel or hop up chamber like many custom flat hops do. Moreover, you do not risk a potentially expensive and damaging modification and install when performing an install of an RTX. While some of these custom flat hop designs may be more accurate, it does approach the point of diminishing returns when you start heavily modifying your internals to the point where increasing chances of equipment failure begin to crop up. The more you push something out of spec, the bigger your chances of Mr. Murphy coming to pay you a visit.

Update: It should be noted that there appears to be some quality control issues with the Maple Leaf buckings. I went through two units before finding one that fit and had a centered contact patch / spline. My overall experience from installing literally dozens and dozens of these things now, has been that no two are completely alike most of the time. They by and large take some finessing and wrangling to obtain satisfactory results with. If you can achieve this, then you have a pretty good hop up system that will generally give you a decent performance boost over traditional units. But be prepared to potentially spend a few extra bucks until you find the right one. I do believe this bucking has been eclipsed by better and more current designs now.

SPLAV SVD Magazine Pouches

Here’s a solution for you SVD owners trying to find magazine pouches to fit the unique shape of theย  SVD magazine. Look no further than Mother Russia to find the SPLAV ‘uni-click’ SVD pouches. I purchased these from KalinkaOptics.com. My favorite nylon manufacturer, Tactical Tailor, sadly does not make an SVD pouch yet ๐Ÿ™

Splav, is a Russian company that manufactures military goods for the Russian armed forces. The pouches are well constructed and feature nice and tight stitching with no loose threads to be evidenced anywhere. The material is genuine 1000 denier Cordura, and has the Russian version of MOLLE type webbing on the back.

I experimented a bit and found that the pouches are 100% compatible with US MOLLE platforms. They can also be set up to run on a belt assembly too. They Fit an SVD Dragunov magazine perfectly, with either rounds facing up, or facing down. The button snaps are strong, but not too strong as to be a hassle to unfasten. Overall I am quite pleased with them. They retail for $14.97 each, or save 14% and buy three for $12.97.

There are also versions available that hold AK, RPK, and Saiga magazines too.

Another alternative for dedicated SVD platforms comes from Beez Combat Systems, who offer a couple of chest rigs designed to support the Dragunov: http://www.beezcombatsystems.com/Chest-Rigs_c5.htm

These are somewhat similar in design to the Russian “Chameleon” style chest rigs: http://www.soviet-propaganda.com/index.php?main_page=product_info&products_id=496

Any of these present excellent options for running with the venerable SVD, but none present true customization and user placement as well as the SPLAV Uni-Click pouches do.

Making an AKS-74U Louder

Own an AKS-74U, Krinkov, AKMSU or other short barreled AK AEG variant? Want to make it a lot louder?

I’ll show you an incredibly easy way to add instant decibels to your shorty AK. Using a real steel Bulgarian 4-piece flash hider, one can achieve the lofty goal of making their AEG loud. The crafty Bulgarians were building these devices long before Mr. Noveske came along and appropriated the design with his “Fire pig” device. All that is required to make this work is that your AEG have a muzzle end that features 24mm threads (which most AKS-74U AEG’s have.) If you do not have 24mm threads, you can buy an inexpensive adapter to go from standard 14x1LH thread to 24mm.

While the 4-piece flash hider is louder than the stock AKS-74U brake all by itself, it can be made a lot louder by disassembling the unit and removing the cone device inside. A dental pick works best for prying up the retainer spring so you can unscrew the muzzle cap on the end to access the cone. One you’ve removed the cone, reattach the muzzle cap, making sure the spring is back in place and attach it to your AEG.

I suspect you could do this with a Noveske “Fire Pig” amplifier as well – if you remove the internal slotted cones. This would probably be the best option for strictly 14x1LH threaded AEG’s. I haven’t tried this yet to see if it works (will report on this tomorrow). I’ve never found the Noveske amplifiers to actually work as advertised, whereas the Bulgarian unit is actually doing the job of making things nasty loud. Obviously the shorter the barrel, the better it’s going to be for sound amplification.

Now for the bad news… Real steel Bulgarian 4-piece flash hiders apparently cost around $120 a pop now. US clone copies are about $89. I bought mine years ago for $5. Inflation sucks.

Now for the good news… Element Airsoft makes a replica that includes an adapter for 14x1LH to 24mm threads for just $34.99!

This is almost as loud as my old Tippmann A5 with the Dishka attached was… Ahhh, the memories of storming bunkers on bingo ammo and shooting nothing but air while the noobs scrambled away from a “hot” sounding weapon. Excuse the crappy cell-phone pics. It’s dark in the man cave.