Here’s my review on the G&G replica 1-4x Elcan SpecterDR. I did a fair amount of research before purchasing this. I came away with a few important tid-bits, namely: there are only 4 makers of replica Elcan’s out there. Most of them do not have a true 1 – 4x throw lever. Most are also strictly straight 4x. Most of them also do not have elevation adjustments. Most have poor eye relief. The G&G version rated best out of them all per reviews, and it features a true 1-4x throw lever,
elevation adjustments, and excellent eye relief. I’ve spent a lot of time and many thousands of rounds behind an Elcan, so the replica has a lot to live up to in my book. Lets see how she performed…
Lets start with the box. Who cares about the box? I’m not going to waste time on describing the box, it’s irrelevant to the function of the optic. It goes into the trash with the rest of the boxes.
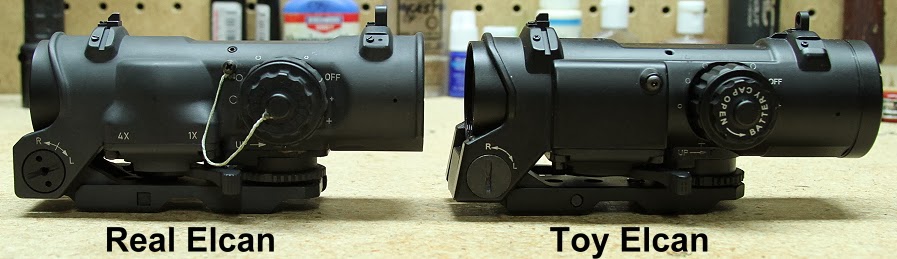
So lets skip to the optic. First thing you will notice when picking this up is that this is a heavy unit. It actually might weigh a tiny bit more than the real Elcan, but without a scale I can only speculate. Overall it feels well constructed and out together. The finish is a semi-gloss black paint that seems to be applied pretty evenly, whereas the real Elcan uses a hard coat gray anodizing. Time will tell how long the paint will hold up in the field.
The optic ships with a spare set of backup iron sights (these mount on top of the sight). It should be noted that if you so choose, you can attach a replica Trijicon RMR or Dr. Optics sight on top too. A pair of batteries and a nice full color instruction sheet is also included.
The G&G features a integral replica ARMS base mount. There are some slight differences between this and the real mount. The major ones being
the lack of trades and a different cross bar on the underside. I also noted that it wasn’t Mil-Spec and thus had a little slop in it when affixed to a picatinny rail. This is pretty common with all Chinese ARMS mount clones, I’ve found. The easy fix is to simply apply a few layers of electrical tape to the underside of the mount to make it snap on snugly. Problem solved.
The following pictures shows a few minor differences between the two units in the body construction. One thing to note is that the replica unit uses a very cheap string to lanyard the battery cap to the main body. I broke this within seconds of fiddling with it. Easily replaced, however, and isn’t a big detractor. The replica Elcan does not have much in the way of markings, other than the battery cap and a few circles and symbols.
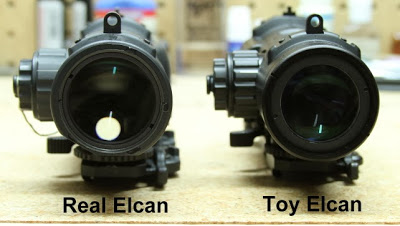
Frontal view. The G&G replica has a slightly smaller objective lens. One thing that is very, very apparent is that the replica does not pass through any light at all. looking from the front of the scope inward, it’s pitch black in there. The real Elcan collects huge amounts of light, and in truth there isn’t much else out there in the real steel optics market that compares to how much light the Elcan grabs.
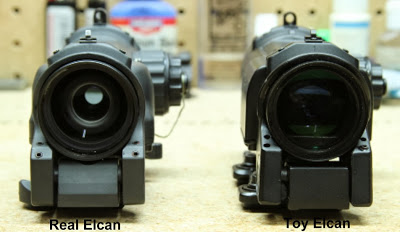
Which brings up another item: the field of view and brightness of the G&G Elcan are significantly less than the real deal. I would say that the real Elcan has a 50 – 75% larger field of view than the replica. It’s also 4 times as bright. For some reason the replica just doesn’t pass through a lot of light – which is probably the biggest
drawback of all. That’s not to say it’s terrible – in fact, it is better than comparable clone ACOG’s. It also has fantastic eye relief. Unlike most magnified replica optics I’ve owned where you have to literally mash your face against the rear lens to see through it, this replica has nearly 3″ of beautiful eye relief.
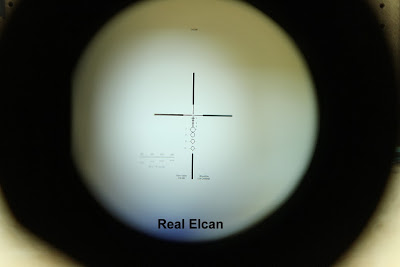
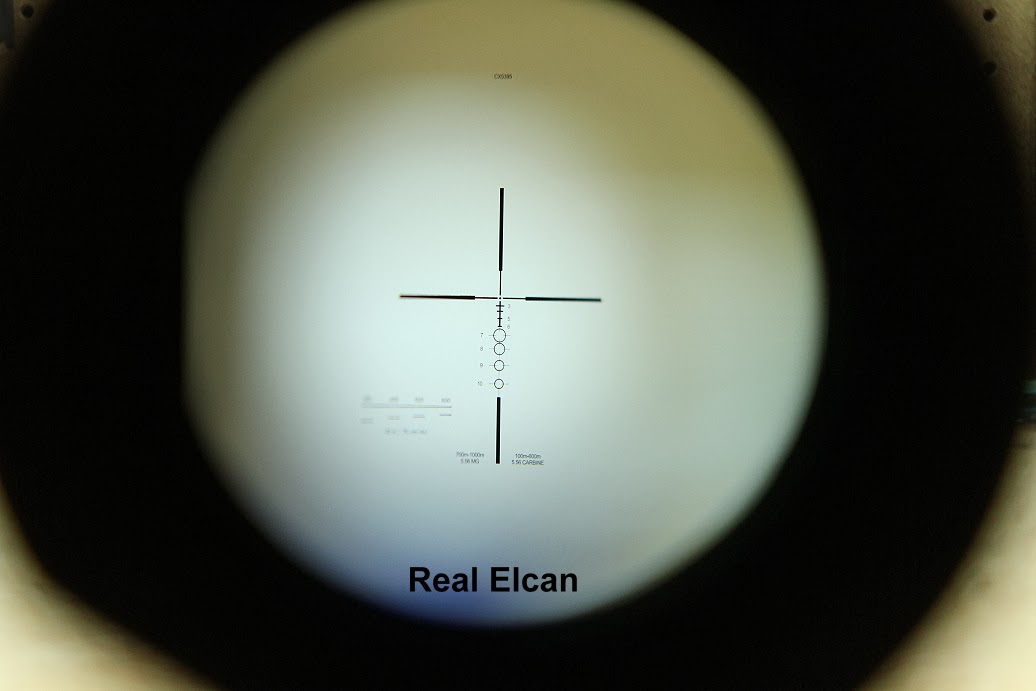
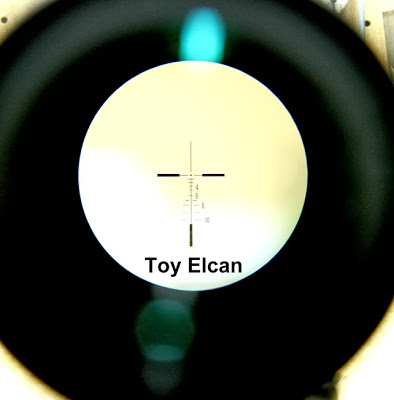
There are some distinct differences in the reticules. The G&G has a very similar reticule to an ACOG. I’m sorry to say my photos of the reticules don’t do either unit justice – they were very hard shots to set up and I had to devise all sorts of contraptions to make things marginally align so I could try to take the photos.
Basic operation of the unit is simple: With the lever in the rearward position you are in 1x magnification. With the lever in the forward position, you get 4x magnification. It should be especially noted that the 1x is not a true non-magnified view such as one finds with an Aimpoint or Eotech that use a flat glass panel. In this regard, an
Aimpoint or Eotech will be somewhat faster to use in CQB due to their true non-magnified style. An Elcan’s beauty is its ability to compensate for both long range and close-in distances with the flip of a lever. It also takes up less rail space than a comparably set up red dot with a 3x or 4x magnifier.
Additionally, the G&G Elcan offers two red dots (green and red) that can be switched on in either 1x or 4x. In 1x mode, this acts as a bit of a red dot (again, not a true red dot). It is very similar to the Bindon Aiming Concept (BAC) as applies to Trijicon ACOG sights. If you aren’t familiar with the BAC, Wikipedia is your friend. Conversely, the real Elcan offers just a red dot, but also the option of illuminating the entire cross-hairs too, which is a pretty nifty feature in the dark.
A big plus is that in 4x, the dot does not become a huge blob such as in replica red dot/magnifier setups. It’s still nice and small.
There is some minor ghosting when the red dot is on its brightest setting – not as bad as some sights I’ve seen though. This too, varies, depending on how bright it is outside – in full sunlight it isn’t noticeable at all. I’m happy to say that the dot size is dead center in the crosshair, and appears to be nice and sharp. I estimate it to be about a 1 or 1.5 MOA dot. The red dot is more visible during the daylight hours. I found the green dot to not be sufficiently bright enough to use during the day. it does work nicely for low light or dark conditions, and coupled with an on board weapon light being used, it makes the reticule easier to see.
I don’t know how long the battery lasts in the replica, and haven’t found any sources that state it anywhere. It uses the fairly common CR2032 type batteries, which is different than the real deal. The real Elcan has an average battery life of 3000 hours, but I doubt the G&G one has anywhere near as much.
Sighting it in. After mounting the G&G, I threw in a few mags of Bioval .30g’s and stepped out on the porch and proceeded to sight in the optic. This was pretty easy to do, and I didn’t discover any backwards dials like some Chinese clones. A notable thing the replica doesn’t have again is the lockout piece on the elevation knob. Not a big deal, as it’s situated in an area where it’s not likely to be bumped out of alignment anyway.
I wound up noticing that there is a fair amount of wiggle in the optic that is independent of the base mount. This didn’t seem to affect zero, but it was slightly annoying. I remedied this by wedging in a piece of rubber in the front area of the optic (you can see this in the photo of the frontal views). No more wiggle.
Switching from 1x to 4x did not affect zero, nor should it, if it’s been properly designed. I also removed and reinstalled the optic several times to test for loss of zero and didn’t find any issues. All good points in G&G’s favor. Overall, sighting it in was a breeze.
In summation, rating key areas on a scale of 1 – 10, 10 being the best:
Construction, fit and finish – Score 8. Overall good, but there are some minor annoyances.
Optical clarity – Score 5. Sorry, but I’m spoiled on the real thing. This isn’t even in the same league or stadium for that matter. Still it’s better than a clone ACOG though.
Optical field of view – Score 7. Better than a clone ACOG, but not half of what the real deal offers.
Optical eye relief – Score 9. The absolute best eye relief I’ve seen in clone optics.
Reticule – Score 9. While not true to life, it is easy to see and use.
Battery life – N/A. Also not really important because you can still use the optic without the battery.
Red dot/Green dot function – Score 7. Not that many brightness settings, and I found the green dot pretty much useless in broad daylight. It should be used primarily as an aid in low light conditions.
Price/availability – Score 4. At $199 shipped, this is one of the most expensive replica optics you can buy. Additionally, there are very, very few US retailers that carry this, and not too many foreign retailers either. I purchased this from www.fullautoairsoft.com (excellent service, btw) and had it in hand from New Jersey in 3 days. The store owners seemed pretty baffled as to why this wasn’t being carried elsewhere. Still it beats paying $2000+ for the real deal, however.
What it is: A great optic that fills the role of a general purpose sight well – capable of reaching out at 4x, but also doing some nice close in work too. A pretty good alternative to red dot/magnifier set ups.
What it isn’t: This should not be used as a replacement for a red dot if all you know how to do is run and operate red dot, and all your optical experience is based off of red dots. I also would not use this nor trust this on my real steel. That would be like trying to make Ford Pinto parts work on your Ferrari.
And some gun-porn to end with…
 Have you ever noticed that even a perfectly shimmed AEG will get a “hot grip” (i.e. a hot motor) during extended periods of semi auto fire? Well there is a very complicated and mathematical reason why. When your motor first receives amperage or current it actually converts DC power into AC in the windings of the motor. When this happens, for about 1/5 – 1/10th of a second, the motor is an inductive load and not a resistive load. That means it is putting amperage and voltage “out of phase” and returning “dirty power” to your battery. While your motor is in an inductive state it is drawing about 30-50 amps depending on your shim job, mechanical load (or resistance), quality of motor, your motors ratio (armatures per turn) and battery cell type.